
ESPGeiger
- steadramon
-
 Topic Author
- Offline
- Senior Member
-

Less
More
- Posts: 40
- Thank you received: 13
3 years 3 months ago - 3 years 3 months ago #6411
by steadramon
ESPGeiger was created by steadramon
Hi all,
This weekend I've finished working on the first revision of my code for recording and uploading counts from pulse and serial based Geiger counters.
The idea with this project is to have an easy to install and configure solution that can be easily contributed to and improved upon in the future.
It is with this that I have written ESPGeiger -
https://github.com/steadramon/ESPGeiger
The project is focued on the ESP8266 and ESP32 modules as these make connectivity easy. It works with generic pulse based counters and the GC10next serial output. In theory it should work with the standard GC10 out of the box as well as other serial based counters with small (if any) code change.
One of the main problems I found with a lot of the code examples is that they use blocking functions to count and/or upload the data - this can cause problems (incccuracy) with counting. This software solution makes use of non-blocking counting functions and asynchronous HTTP uploads for Radmon and other services - uploading shouldn't cause counting issue.
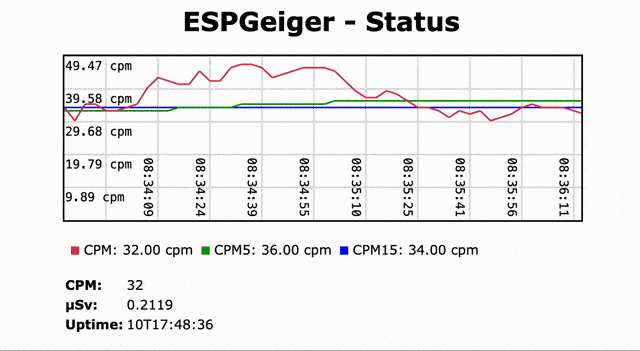
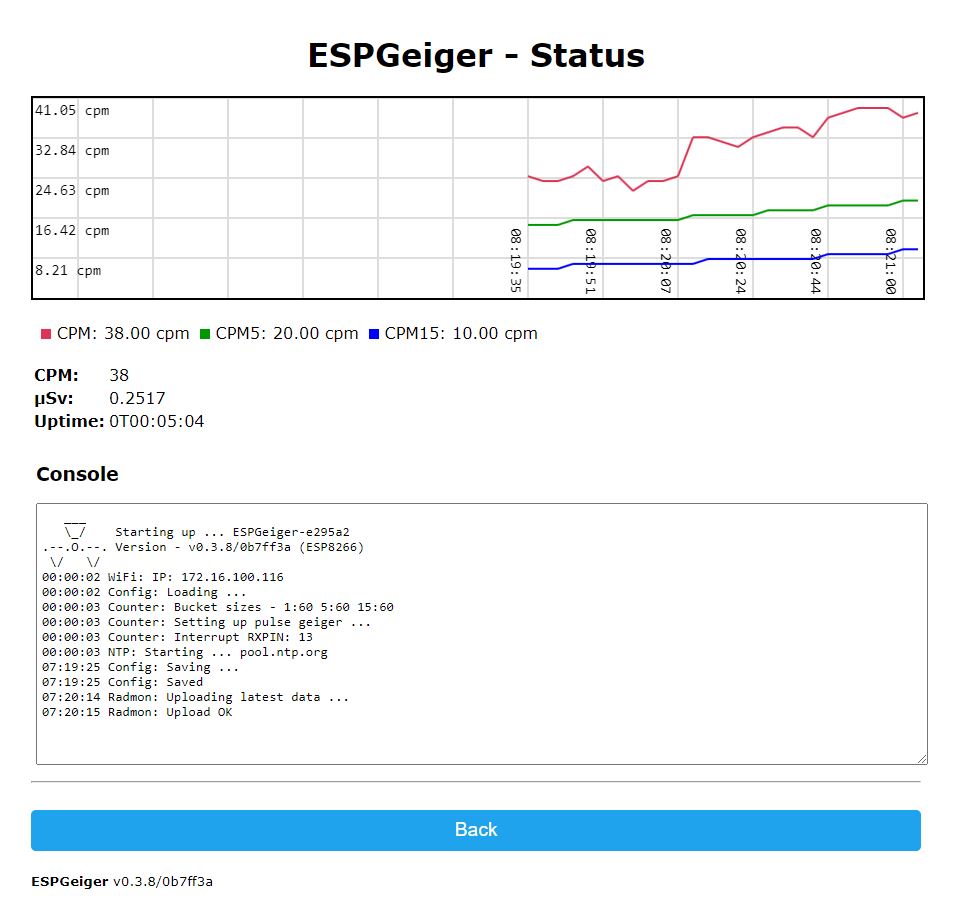
Also as the count is uploaded on a minutely basis I have implemented on-board 1, 5 and 15 minute averages - currently the 1 minute average is the one uploaded.
Noise on the counter line can cause false counting with examples I've seen, here we use an adaptable debounce mechanism for native interrupt counting - but with ESP32 devices we have a nice hardware counter with a very nifty noise filter which can aleviate the need for hardware adjustments.
Please note that this is very much a work in progress - whilst I've done my best to make this easy to install a little knowledge of Platformio is required - although this is pretty standard for projects of this kind. I'm happy to give some support either here or via PM.
I am working on the first official release, however the current version is ready for testing already and has proven very stable.
The code is configurable - I hope to document this configuration better in the coming days - the RX pin for both Serial and Pulse counters is PIN 13 - this can be overwritten by build options in the environments.ini (and/or platformio.ini)
I hope some of you have an opportunity to try out the code and let me know of any problems you have. Github is automatically building firmware so you can use one of the prebuilt images or configure and build you own via Platformio.
This weekend I've finished working on the first revision of my code for recording and uploading counts from pulse and serial based Geiger counters.
The idea with this project is to have an easy to install and configure solution that can be easily contributed to and improved upon in the future.
It is with this that I have written ESPGeiger -
https://github.com/steadramon/ESPGeiger
The project is focued on the ESP8266 and ESP32 modules as these make connectivity easy. It works with generic pulse based counters and the GC10next serial output. In theory it should work with the standard GC10 out of the box as well as other serial based counters with small (if any) code change.
One of the main problems I found with a lot of the code examples is that they use blocking functions to count and/or upload the data - this can cause problems (incccuracy) with counting. This software solution makes use of non-blocking counting functions and asynchronous HTTP uploads for Radmon and other services - uploading shouldn't cause counting issue.
Also as the count is uploaded on a minutely basis I have implemented on-board 1, 5 and 15 minute averages - currently the 1 minute average is the one uploaded.
Noise on the counter line can cause false counting with examples I've seen, here we use an adaptable debounce mechanism for native interrupt counting - but with ESP32 devices we have a nice hardware counter with a very nifty noise filter which can aleviate the need for hardware adjustments.
Please note that this is very much a work in progress - whilst I've done my best to make this easy to install a little knowledge of Platformio is required - although this is pretty standard for projects of this kind. I'm happy to give some support either here or via PM.
I am working on the first official release, however the current version is ready for testing already and has proven very stable.
The code is configurable - I hope to document this configuration better in the coming days - the RX pin for both Serial and Pulse counters is PIN 13 - this can be overwritten by build options in the environments.ini (and/or platformio.ini)
I hope some of you have an opportunity to try out the code and let me know of any problems you have. Github is automatically building firmware so you can use one of the prebuilt images or configure and build you own via Platformio.
Last edit: 3 years 3 months ago by steadramon. Reason: url
The following user(s) said Thank You: Vinkx
Please Log in or Create an account to join the conversation.
- steadramon
-
Topic Author
- Offline
- Senior Member
-
Less
More
- Posts: 40
- Thank you received: 13
3 years 3 weeks ago - 3 years 3 weeks ago #6477
by steadramon
Replied by steadramon on topic ESPGeiger
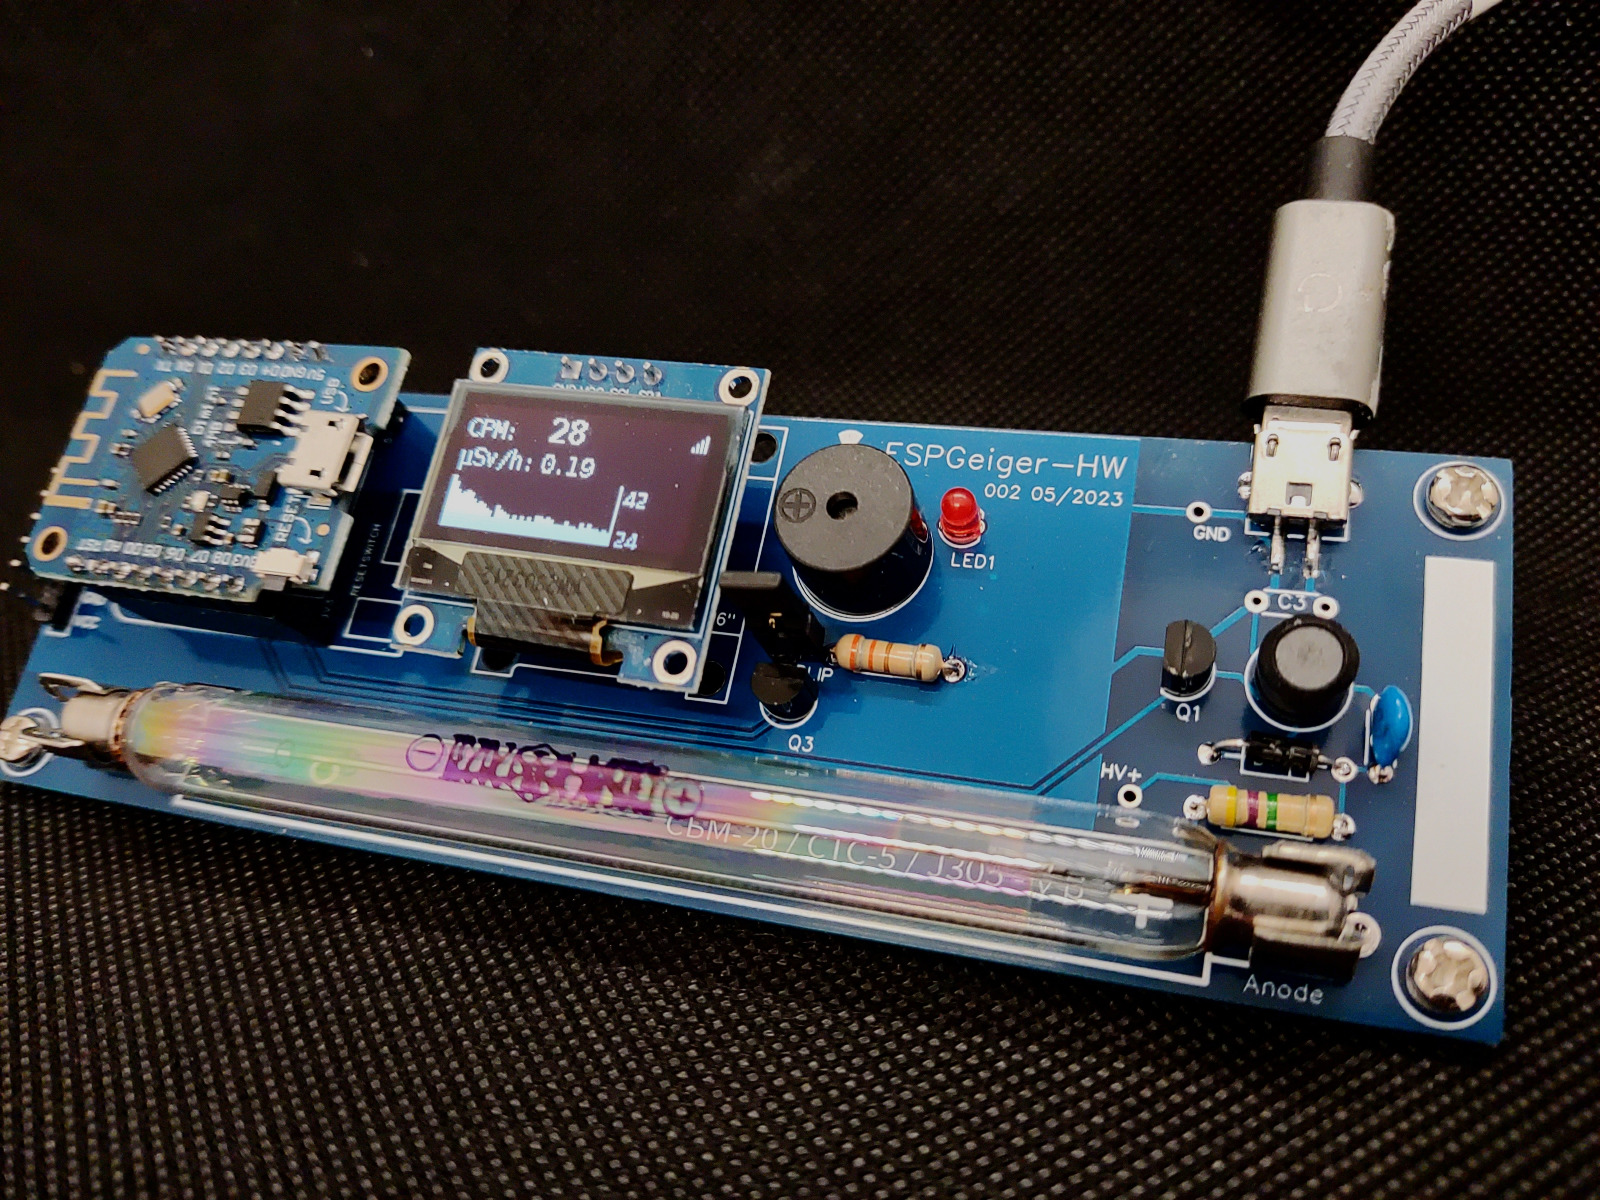
Just to add, recent updates include automatic integration to Home Assistant, improvements to stability, as well as support for building a Geiger Counter hardware supported by the software
Attachments:
Last edit: 3 years 3 weeks ago by steadramon.
Please Log in or Create an account to join the conversation.
- steadramon
-
Topic Author
- Offline
- Senior Member
-
Less
More
- Posts: 40
- Thank you received: 13
3 years 5 days ago - 3 years 5 days ago #6507
by steadramon
Replied by steadramon on topic ESPGeiger
There are several options when installing ESPGeiger -
Note: With the prebuilt images currently only one pin (GPIO pin 13) is available for the interrupt, however there is ability to change this with custom builds. This is possibly going to be built into the firmware as an adjustable pin
- Platform.io Based Installation with automated dependencies
- Arduino IDE - build with dependencies manually installed
- Install one of the pre-built binaries from Github
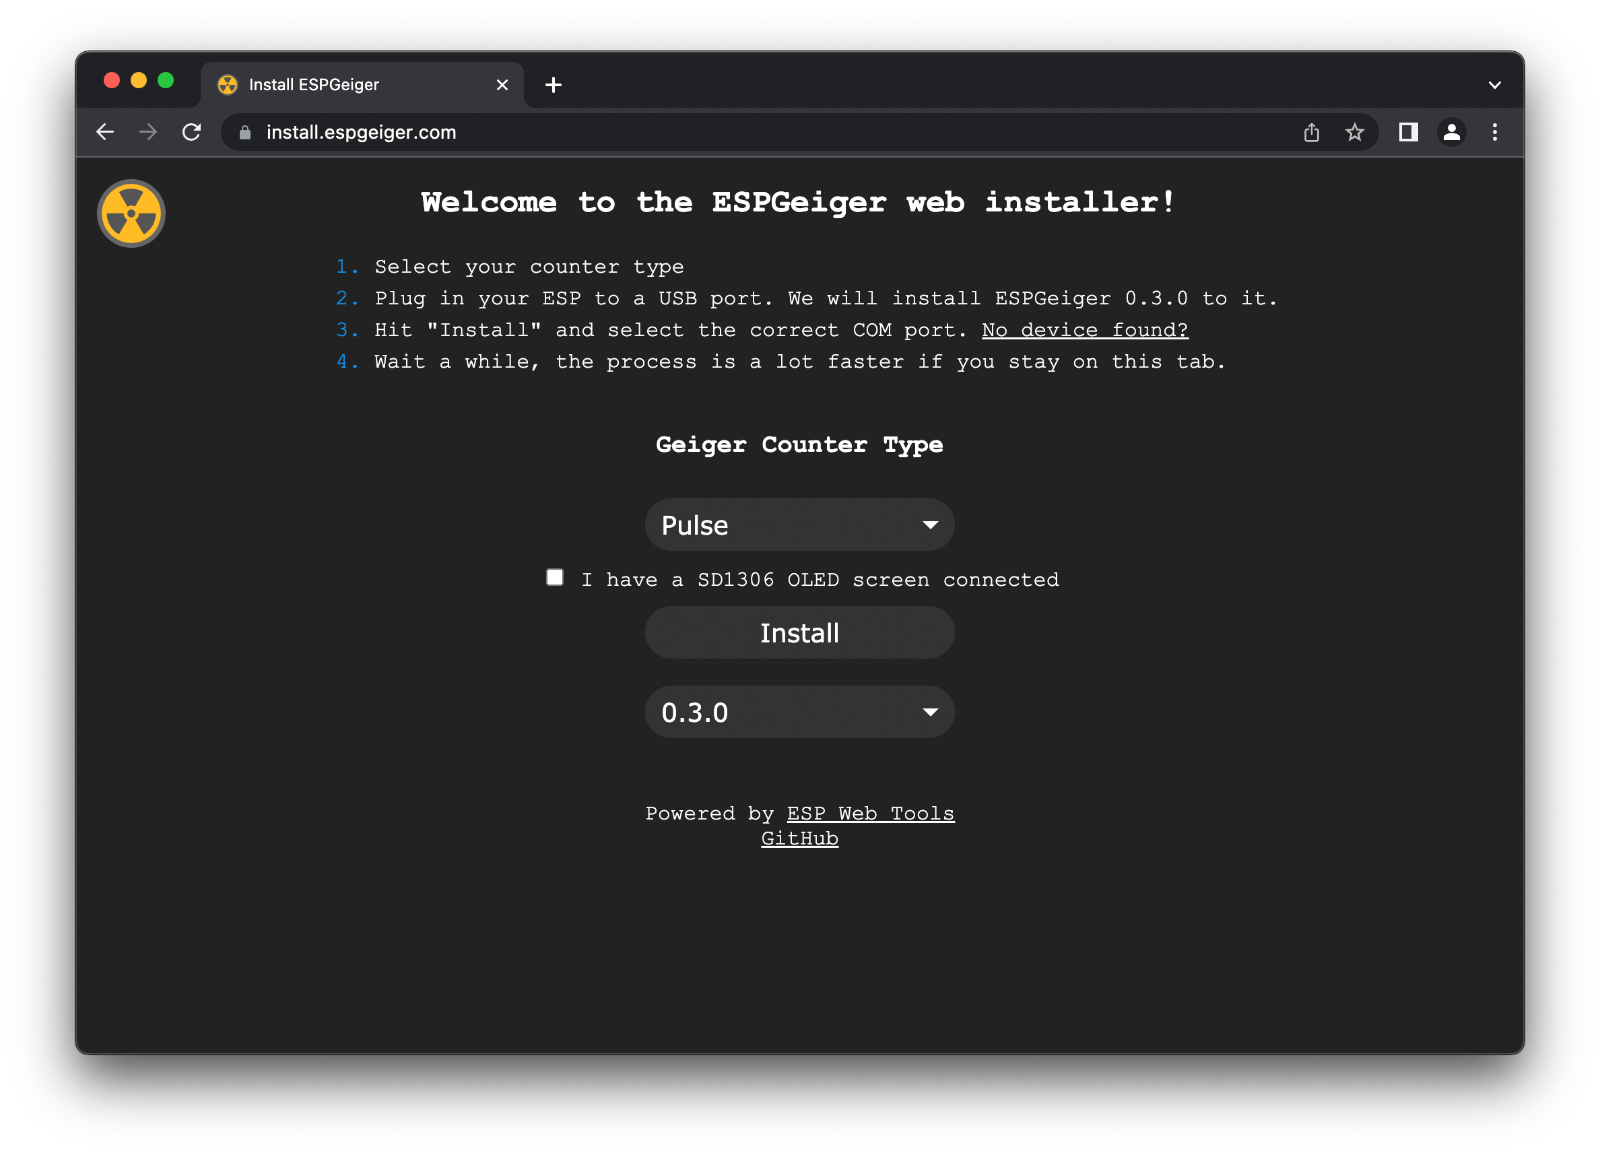
- And now, an easy Web-based installer, simply select your Geiger Type and click install! https://install.espgeiger.com/
Note: With the prebuilt images currently only one pin (GPIO pin 13) is available for the interrupt, however there is ability to change this with custom builds. This is possibly going to be built into the firmware as an adjustable pin
Attachments:
Last edit: 3 years 5 days ago by steadramon.
The following user(s) said Thank You: Vinkx
Please Log in or Create an account to join the conversation.
2 years 9 months ago #6671
by Simomax
I decided to have a go with the web installer as I have never used any such thing with an ESP. Sadly it didn't work for me. I'll try and give as much detail as I can.
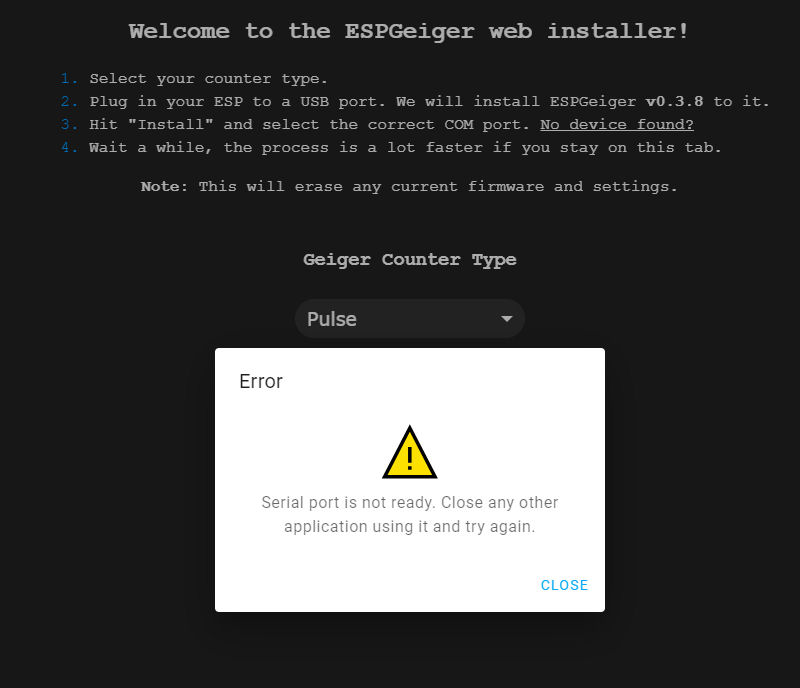
I connected an ESP - Wemos D1 Mini clone, and followed the on screen prompts. I was going to connect this to my breadboard counter so I went with the basic 'Pulse' option, then selected the serial post (com 3). It went through the erasing process, then uploaded the firmware, got right to 100% then came back with the following error: 'Serial port is not ready. Close any other application using it and try again' - image below. So I tried again, and still the same outcome. This is chrome BTW, just plain old basic chrome. I then tried Edge, and got exactly the same result with that. Oh, the onboard LED is on solid, if that means anything, but was on and off a few times when uploading the firmware.
I went back through the process again and chose the logs & console option and it gave me this: 'Terminal disconnected: BufferOverrunError: Buffer overrun'
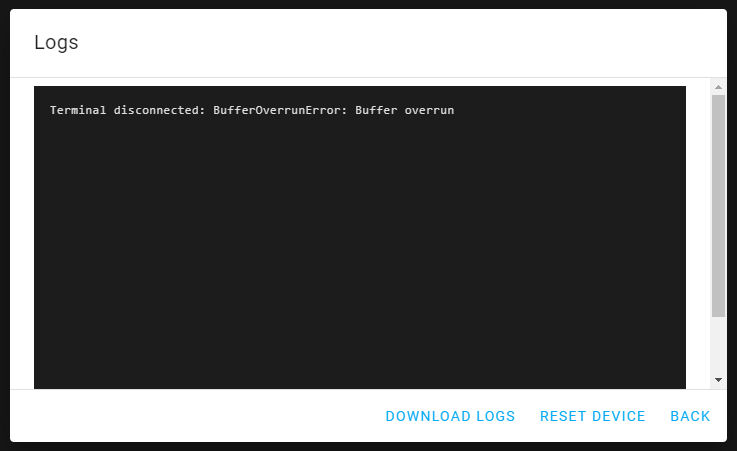
I don't think the D1 mini is at fault (although could be) as I have uploaded sketches via the arduino IDE without issue. The D1 mini was working fine with another sketch before hitting the install button. When I have the logs console open (all still in the browser) and hit 'Reset Device' I get this message: 'Terminal disconnected: FramingError: Framing error'. Really not sure what is going on. It seems to have no actual debug logs or anything for any of the process I am trying to achieve, so kind of at a loss how, or where to poke this thing. Any ideas?
I connected an ESP - Wemos D1 Mini clone, and followed the on screen prompts. I was going to connect this to my breadboard counter so I went with the basic 'Pulse' option, then selected the serial post (com 3). It went through the erasing process, then uploaded the firmware, got right to 100% then came back with the following error: 'Serial port is not ready. Close any other application using it and try again' - image below. So I tried again, and still the same outcome. This is chrome BTW, just plain old basic chrome. I then tried Edge, and got exactly the same result with that. Oh, the onboard LED is on solid, if that means anything, but was on and off a few times when uploading the firmware.
I went back through the process again and chose the logs & console option and it gave me this: 'Terminal disconnected: BufferOverrunError: Buffer overrun'
I don't think the D1 mini is at fault (although could be) as I have uploaded sketches via the arduino IDE without issue. The D1 mini was working fine with another sketch before hitting the install button. When I have the logs console open (all still in the browser) and hit 'Reset Device' I get this message: 'Terminal disconnected: FramingError: Framing error'. Really not sure what is going on. It seems to have no actual debug logs or anything for any of the process I am trying to achieve, so kind of at a loss how, or where to poke this thing. Any ideas?
Attachments:
Please Log in or Create an account to join the conversation.
- steadramon
-
Topic Author
- Offline
- Senior Member
-
Less
More
- Posts: 40
- Thank you received: 13
2 years 9 months ago - 2 years 9 months ago #6674
by steadramon
Replied by steadramon on topic ESPGeiger
The webinstaller javascript is supplied by ESPWebtools.. This is the first I have seen of this error - are you sure that you do not have any other programs that might be using the serial at the same time? Have you got the right drivers installed (just reading some advice from https://github.com/esphome/esp-web-tools) I've flashed at least a dozen different boards this way.
You say it got to 100% and the led is lit - this is possible that the firmware has installed and is waiting for you to set up - did you spot a new WiFi hotspot like ESPGeiger-xxxxxx?
If you were to connect to the Serial using the Arduino IDE you should be able to monitor the Serial output (115200)- what does this show?
An alternative manual installation option could be to use https://github.com/tasmota/tasmotizer and use the latest binary release @ https://github.com/steadramon/ESPGeiger/releases/latest
Manual Flashing
1. Download Tasmotizer
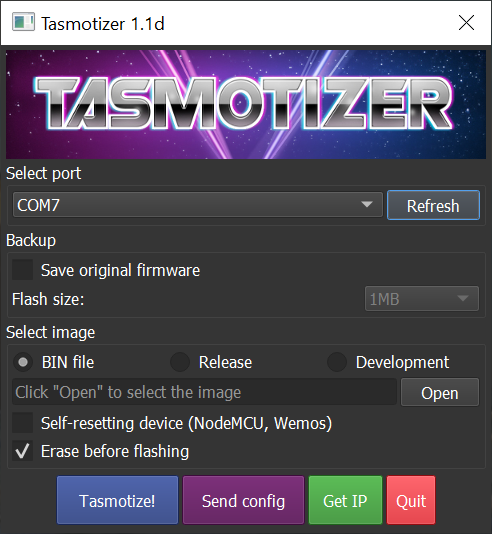
For Windows download and install the latest standalone .exe from Github .
2. Download ESPGeiger Binary
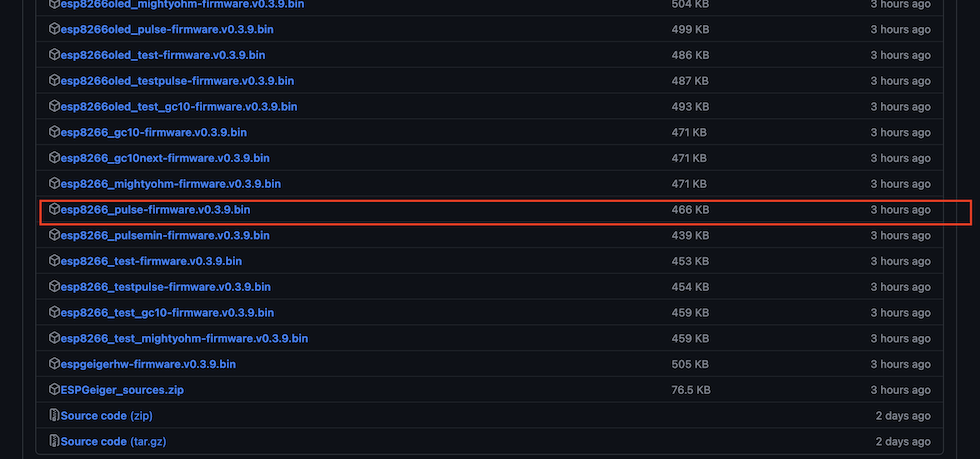
Download the latest version of the ESPGeiger binary from Github
Depending on your combination you can select an appropriate binary file to download.
Since we are focusing on the ESP8266 Pulse variant, I will select the "esp8266_pulse-firmware.v0.3.9.bin" file.
Download the file and save it on your computer at a known location for later use.
3. Flash Using Tasmotizer
4. Setup WiFi
5. Main Setup
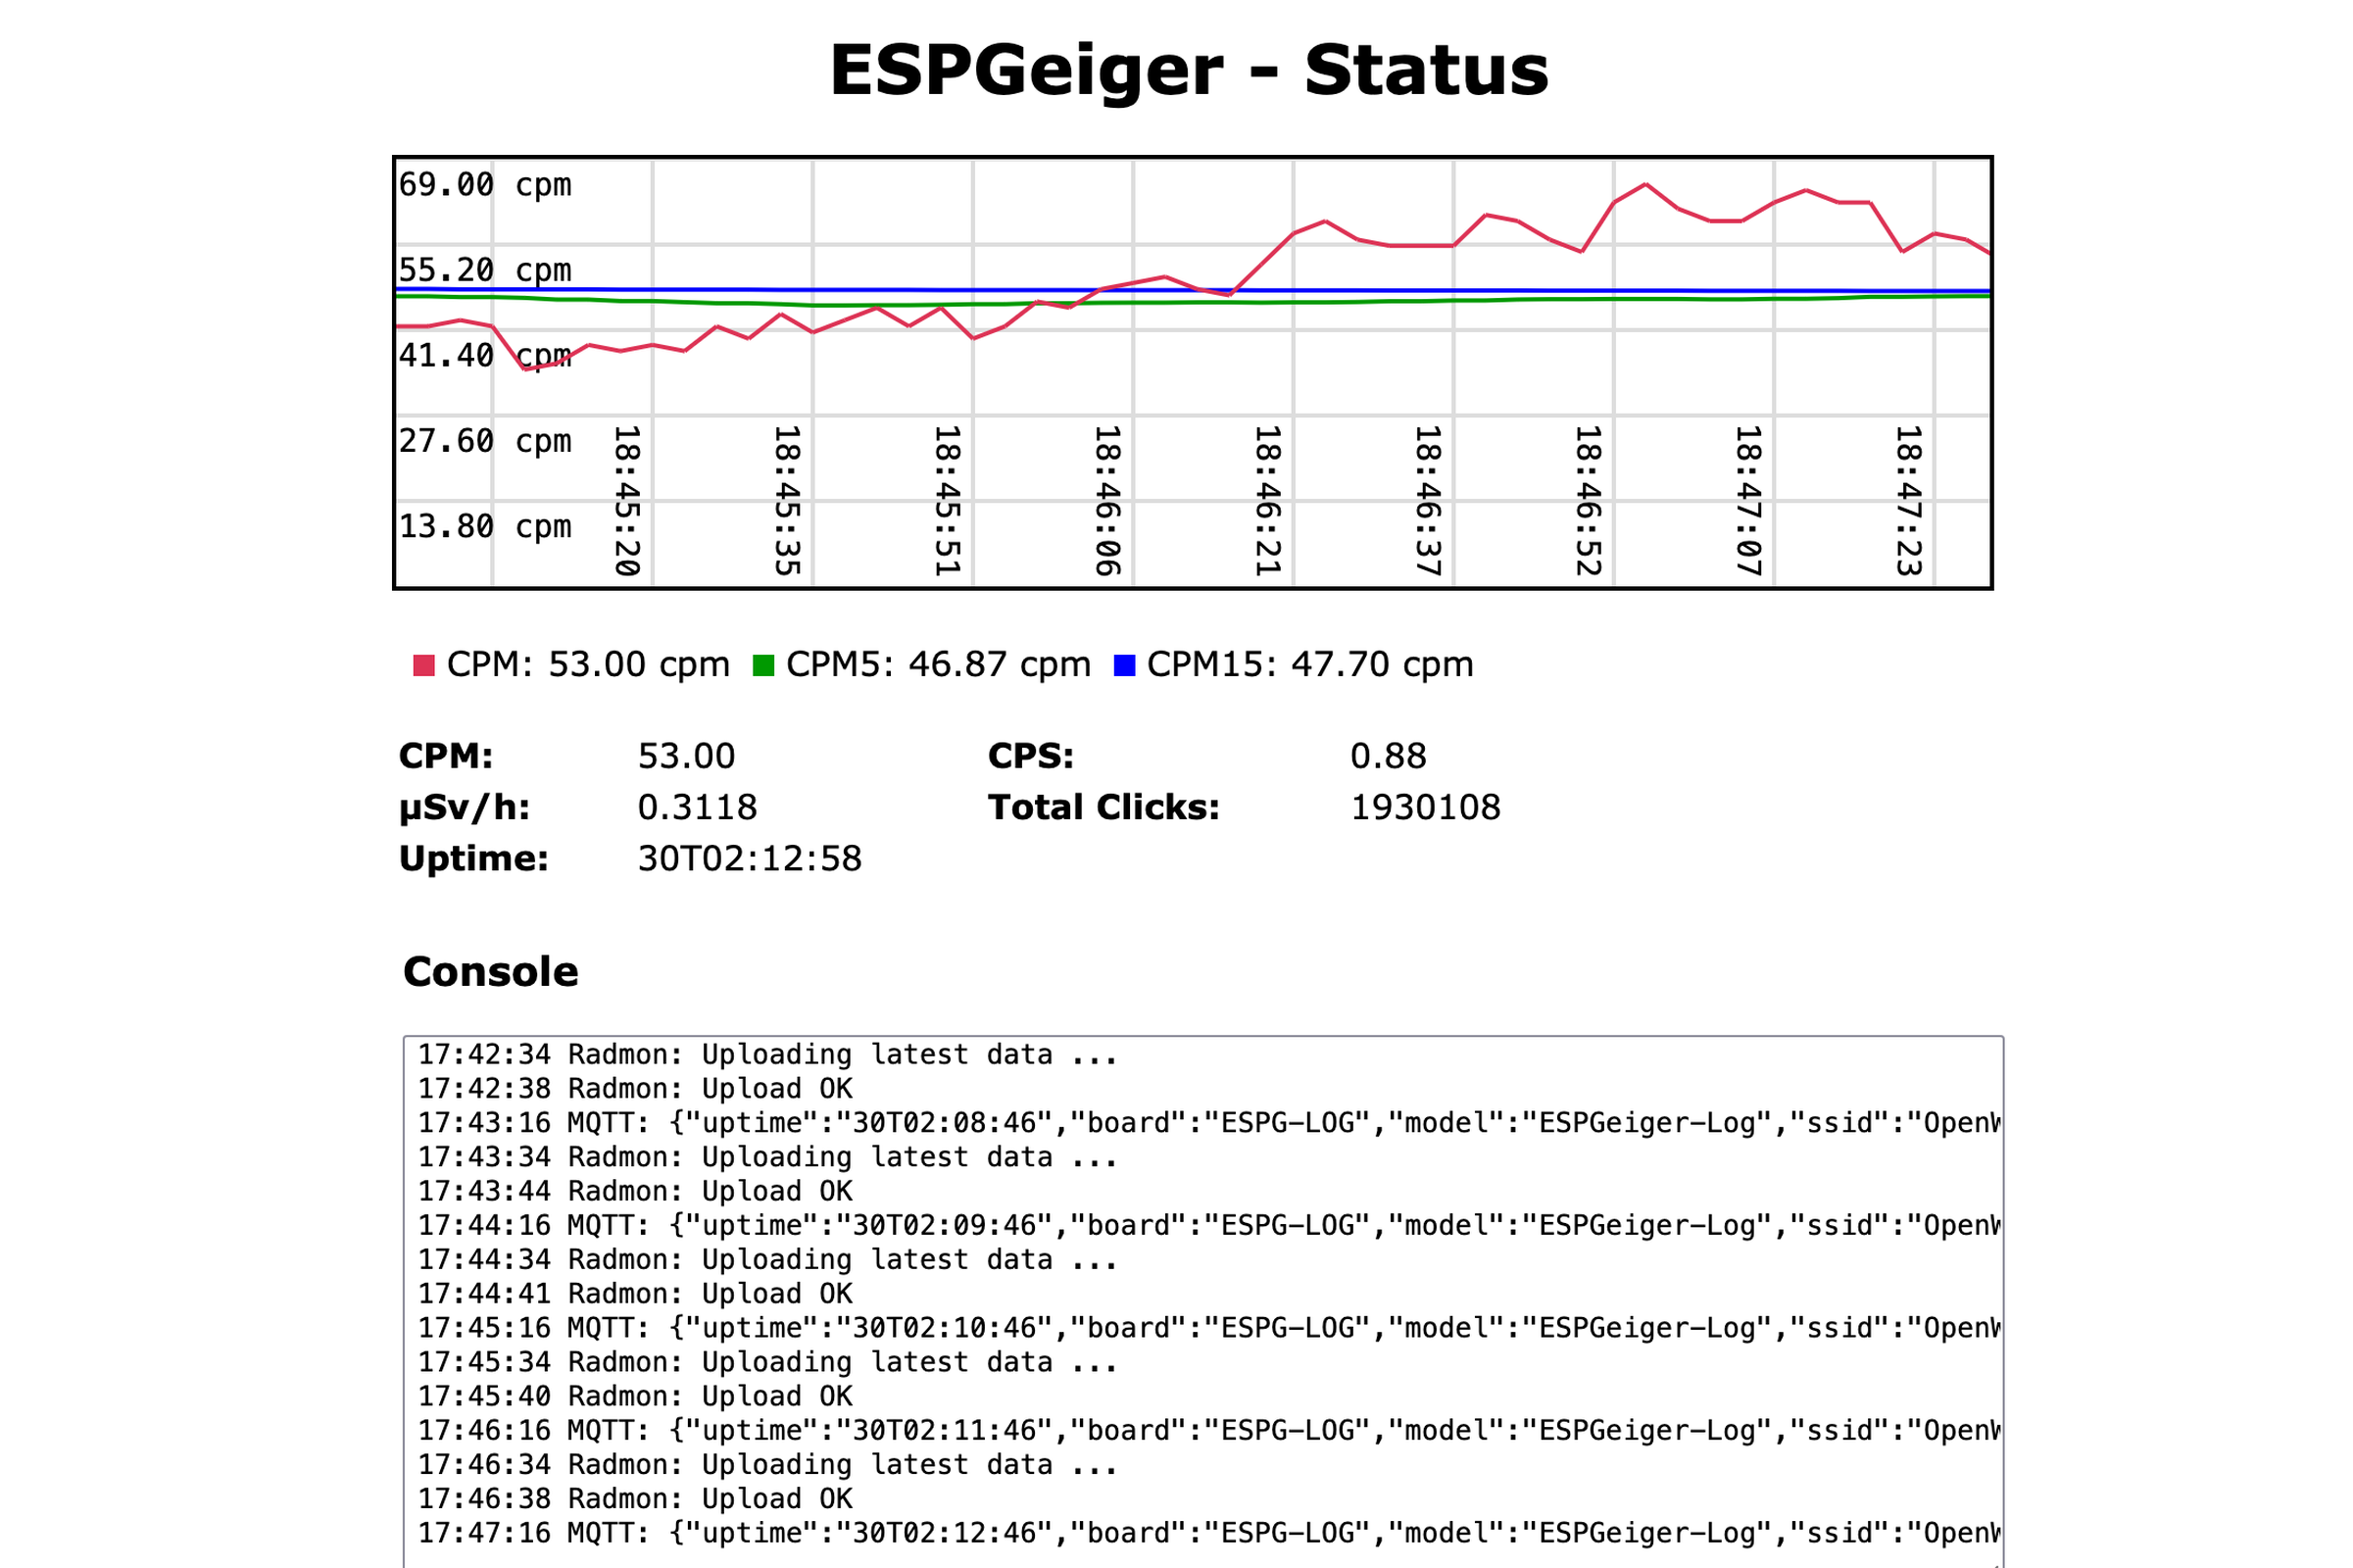
From here you can set up the various functions by clicking Setup or view the status page by clicking Status
You say it got to 100% and the led is lit - this is possible that the firmware has installed and is waiting for you to set up - did you spot a new WiFi hotspot like ESPGeiger-xxxxxx?
If you were to connect to the Serial using the Arduino IDE you should be able to monitor the Serial output (115200)- what does this show?
An alternative manual installation option could be to use https://github.com/tasmota/tasmotizer and use the latest binary release @ https://github.com/steadramon/ESPGeiger/releases/latest
Manual Flashing
1. Download Tasmotizer
For Windows download and install the latest standalone .exe from Github .
2. Download ESPGeiger Binary
Download the latest version of the ESPGeiger binary from Github
Depending on your combination you can select an appropriate binary file to download.
Since we are focusing on the ESP8266 Pulse variant, I will select the "esp8266_pulse-firmware.v0.3.9.bin" file.
Download the file and save it on your computer at a known location for later use.
3. Flash Using Tasmotizer
- Open Tasmotizer.
- Make sure you select the port of your connected micro-controller. On Windows, you can find the port by navigating to "Device Manager" and looking for a CH340 device under "Ports"
- In Tasmotizer under the "Select image" section, make sure "Bin file" is selected.
- Click on "Open"
- Select the appropriate .bin file for the micro-controller you are about to flash.
- Erase flash if you're coming from a different/old firmware
- Click "Tasmotize" and wait for the process to finish.
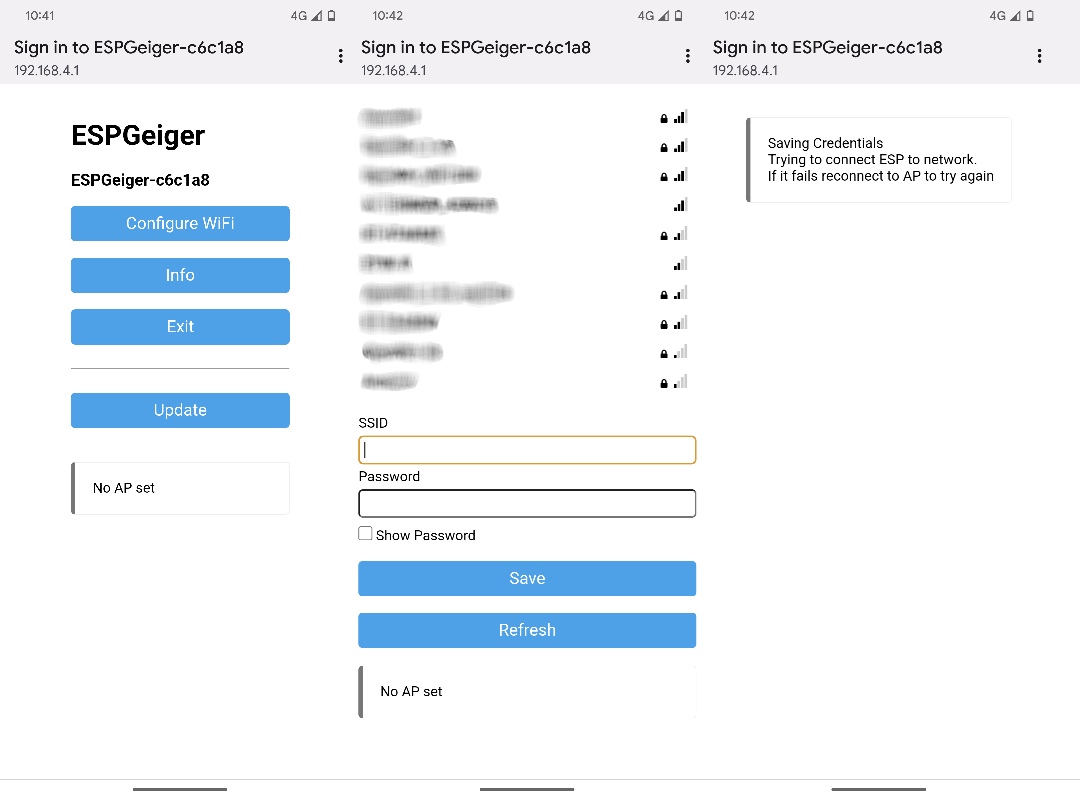
4. Setup WiFi
- Power up your micro-controller
- Move to your mobile phone, or any device that can connect to WiFi networks.
- Search for a new WiFi network
- A hotspot like ESPGeiger-XXXXXX should be listed as a WiFi network.
- When connected you should automatically be redirected to the WiFi configuration page
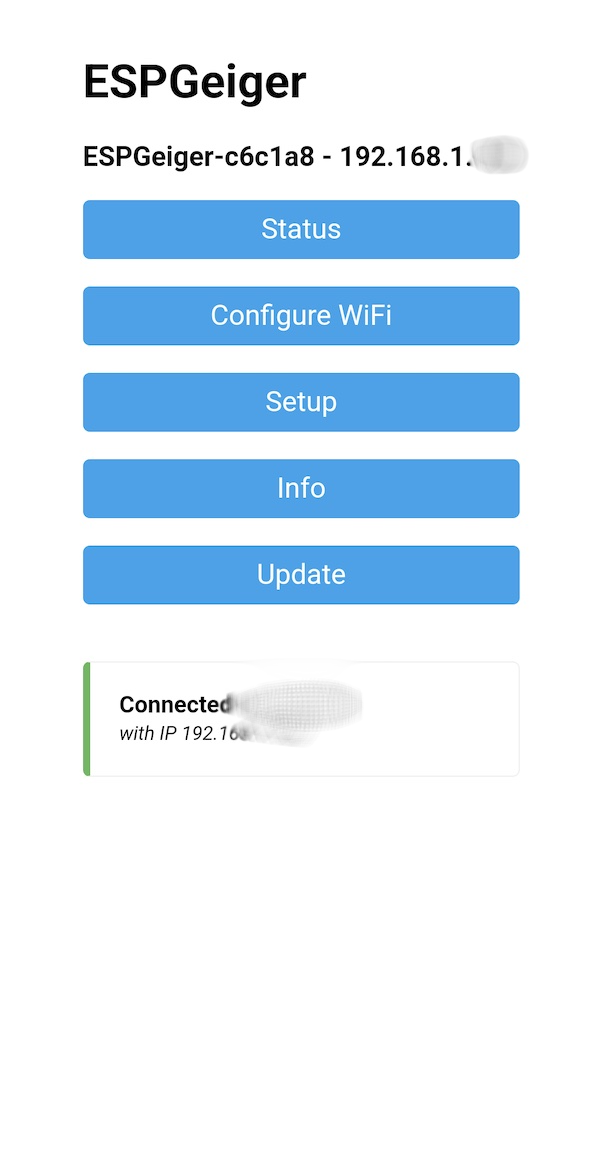
- If it does not automatically connect, navigate to 192.168.4.1 in a browser.
- Write down the unique address of your micro-controller (http://espgeiger-xxxxxx.local) before you continue. You will use this address to navigate to your micro-controller after connecting it to your home network.
- Click "Configure WiFi"
- Enter your WiFi credentials (SSID and Network password)
- Save the settings.
- Wait a few seconds.
- Connect your computer back to your home network
- Enter the address you wrote down for your micro-controller in (4).
- You should now be presented with the ESPGeiger interface on your micro-controller.
5. Main Setup
From here you can set up the various functions by clicking Setup or view the status page by clicking Status
Attachments:
Last edit: 2 years 9 months ago by steadramon. Reason: style
Please Log in or Create an account to join the conversation.
2 years 9 months ago #6676
by Simomax
I managed to get this working. Apparently it was working despite that error. Not sure why the browser reported the serial port not available.
 Plugged it back into power, looked for the wifi, it was there. Connected fine.
I also fell over a little from your other post. It shows connecting the pulse to pin D6, but is actually D7 on my D1 mini clone. I noticed on the status it reported interrupt on GPIO13, which is D7 on the Wemos D1 Mini, not D6. Anyway, seems to be wworking now. It's setup on my breadboard counter (essentially a DIYGeiger GK v5.5 - older version of the circuit, but works really well) with an SBM20. I'll leave it running for a bit and have a play about with it.
A couple of other small thing I fell over, that other users may struggle with. I suspect some documentation, a step-by-step guide may help - After I connected to the ESP wifi I didn't know it's IP address, or how to connect to the ESP on my phone's browser. Hitting the 'manage router' button on the wifi setting of my phone took me right there. Again, once I had changed to my home wifi I didn't know the IP address, so had to use an app on my phone to scan my wifi and then go through about 6 ESP's that I have at home. It was the 5th one I tried and got the ESPGeiger main page. Configured the rest through my PC browser and all good. I suspect these little things, other people may trip up on.
Attachments:
Please Log in or Create an account to join the conversation.
Moderators: Gamma-Man
Time to create page: 0.224 seconds