
- Forum
- Geiger counter discussions
- Commericial geiger counters
- A little gem - The Yaorea YRG01 (Review & Mod)
A little gem - The Yaorea YRG01 (Review & Mod)
1 year 2 months ago - 1 year 2 months ago #7321
by Simomax
A little gem - The Yaorea YRG01 (Review & Mod) was created by Simomax
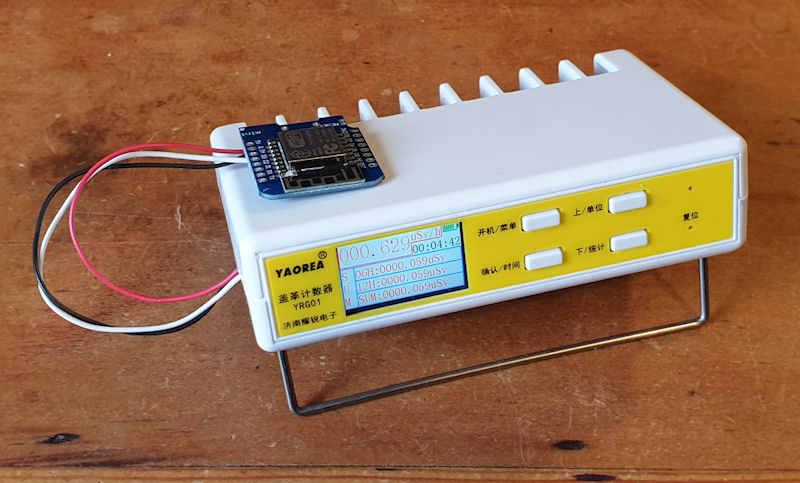
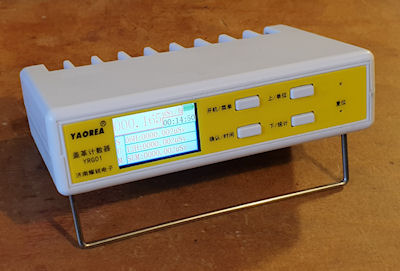
Yaorea YRG01
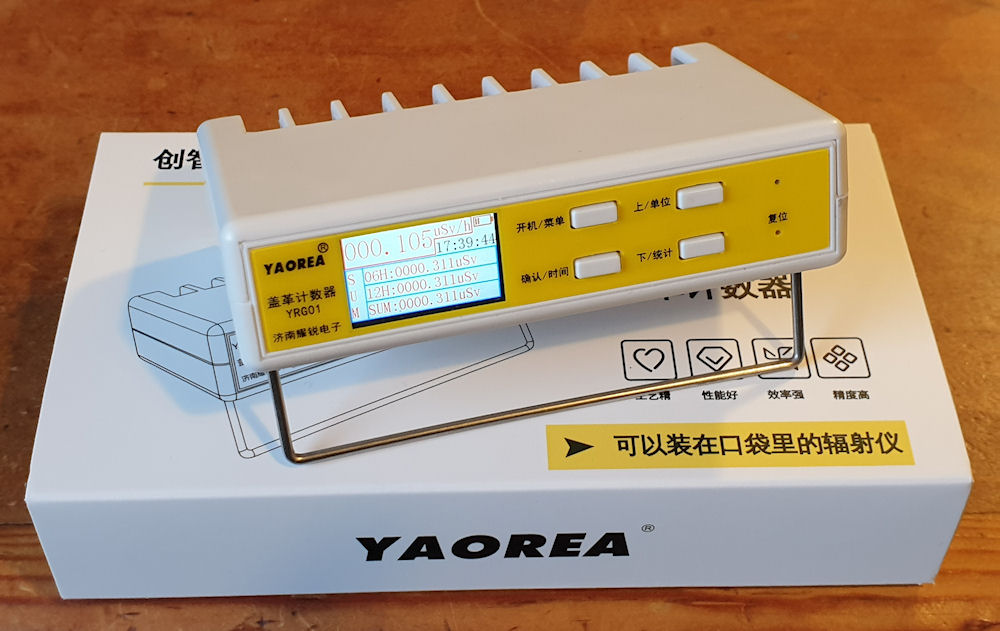
I bought another cheap Chinese counter from Aliexpress and I am impressed, especially for the price of £27 shipped to my door. Despite its cheap appearance it actually offers a lot of bang for buck. I haven't looked into it closely, but there seems to be a lot of attention to detail, and I reckon whoever designed this really gave a damn about it.

It came up in suggested products on Aliexpress and I wouldn't have bothered about it if not for the fact that someone reviewed it and posted pictures of its insides. "Okay, a glass tube... Ooh a separate PSU board with a big hunking transformer on it, a proper speaker? Full colour display and an 18650 battery? For £27?" Click, click, bought!

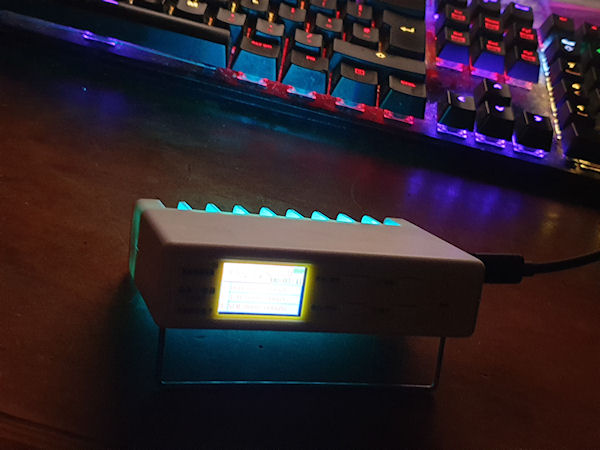
First impressions when I opened the box were..... It's tiny! It is small. Smaller than I expected. Too small to fit a SBM-20 tube in it, so the glass one will be staying for a while. This has some neat features, some of which the other cheap Chinese counters should, or could have had. You can select between different units - CPS, CPM, uSv/h, uR/h. It can display the average dose, accumulated dose and the minimum and maximum dose. It has a clock (which sadly is not battery backed, so does reset when removing the battery) and it also has a data logging capability of recording for about 170 days at (AFAIK) 1 minute intervals.
It has BLE, but no app, so not sure about that.
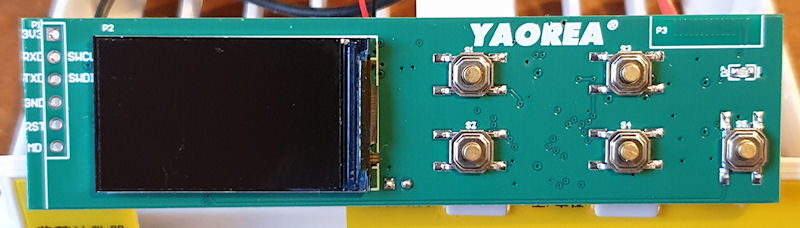
 The menu is a little cumbersome and all of the front panel labelling is Chinese, but once you get used to it, it's not too bad. Navigating the recorded data is a little fiddly, and it doesn't seem there is a way to download the data, only view it on the device. But, c'mon, it's £27! You can set 3 alarms, set the backlight timeout and level, turn on and off the clicker, key press bleeps and alarm. It can be set to turn off after a set length of time. It has RGB LEDs under the tube, three of. It lights up the tube. It's like mood lighting, for a Geiger counter! I'll come back to that further on.
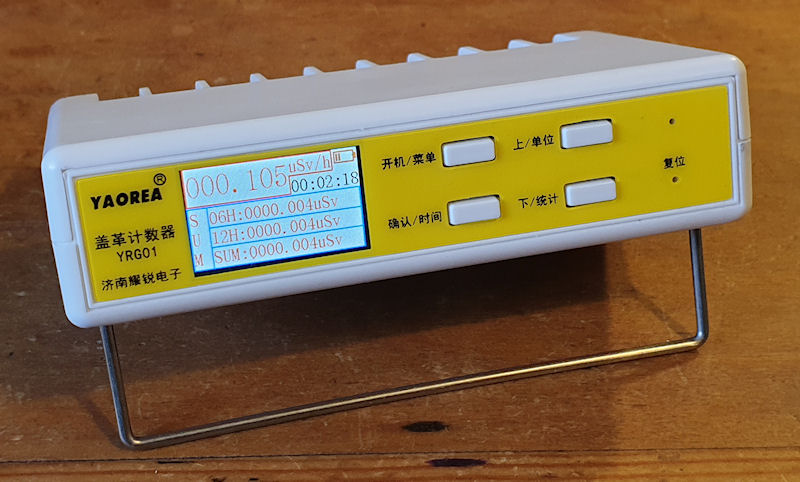
Another neat feature, often not seen on cheap counters, is its low power mode. According to the manual (more on that later too) the low power mode consumption is ≥11mA. That's not bad. Running from a 2000mAh battery it should last around 180 hours / 7.6 days. That's a far cry from the 24 hours max I get from my pen type counter. You can also run it from USB C, and charge the battery. When it is in low power mode it turns off the display, the RGB LEDs and also the BLE, so is simply counting and logging. Pressing any button wakes it back up again.
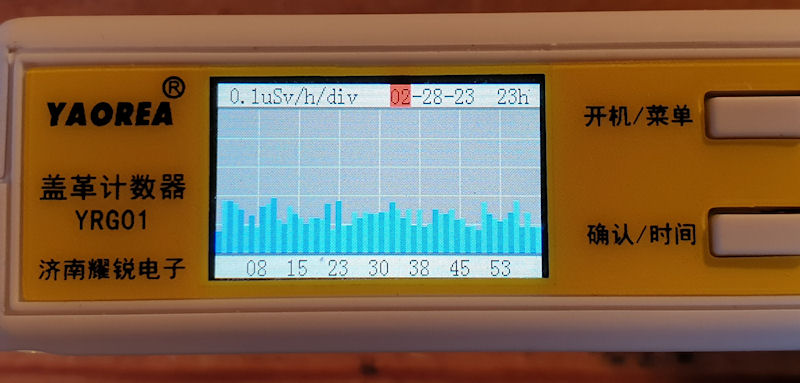
The data logging feature is nice, but a bit awkward to navigate, and viewing the charts on the tiny screen requires my strongest reading glasses. The days, months and years don't roll over either, so if you are going through the logs, hour by hour it doesn't roll over to the next day, and you have to select that day, then back to hours, scroll again, then select the next day, or month, year etc. So it's all a bit cumbersome. It is ideal though for just going to a specific day to view that day's data. Interestingly, this unit came with the memory already filled, or at least a fair amount of it. It doesn't look like this unit has been used before at all, so may have been some way of testing the flash memory, by filling it up somehow, but wasn't deleted. Or it is a returns unit in a new case. Whatever it is, I'm not bothered.
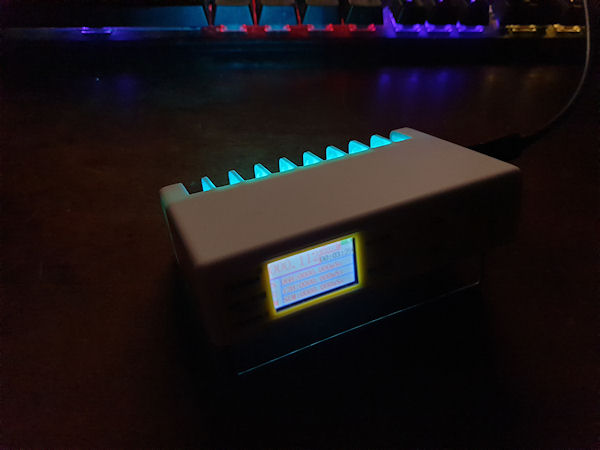
The display is quite basic, and the tiny text can be a little hard to read. The menus are fairly intuitive and easy to get to grips with. Again, navigation and selection are awkward, but after messing with it a bit, you do get the hang of it.
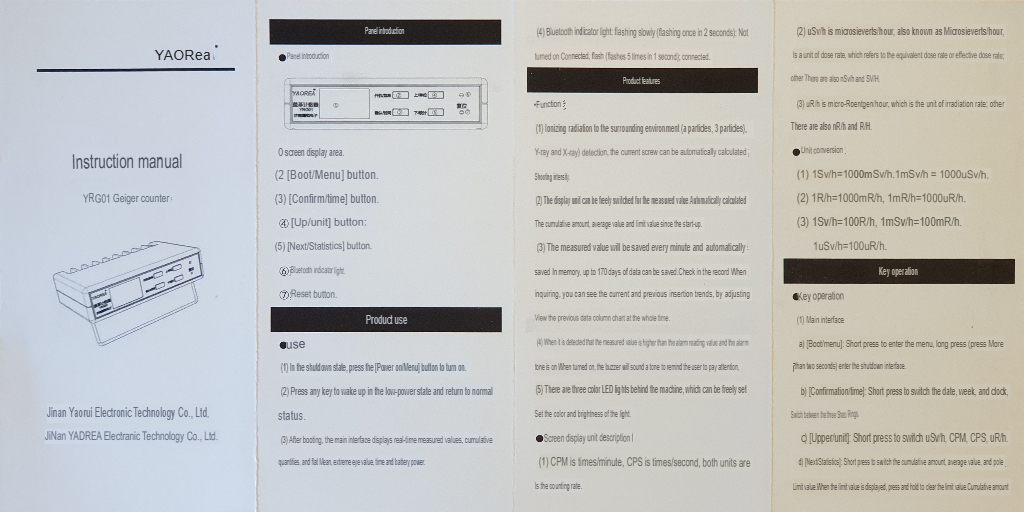
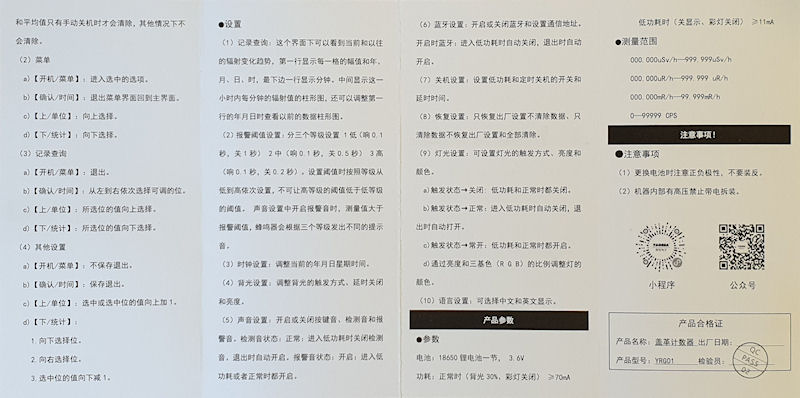
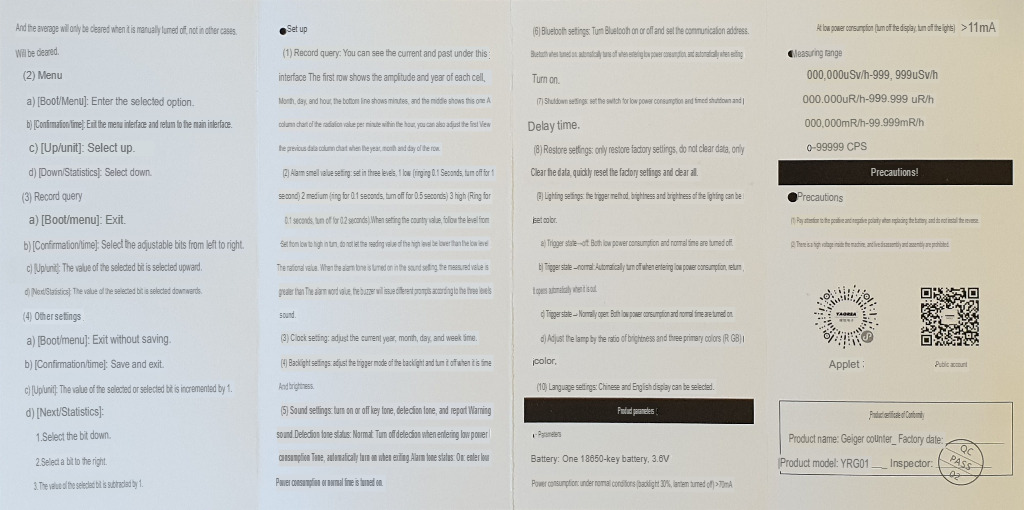
The instructions (attached to the bottom of this post) are completely in Chinese so I had to work out how to use the counter by just pushing buttons, and within half an hour or so I had it all worked out.
 I used an AI image translator then fed the Chinese manuals to Lala, my faithful AI assistant and it gave me a nice basic PDF of the manual in English in return. And it actually makes sense. I also used the AI image translator to translate the front panel, as that is all in Chinese then I (yes, me, not AI, just me this time) photo-shopped it into English. The manual states the selected unit can be uGy/h, but I can’t select it, just cycle through CPS, CPM, uSv/h and uR/h.

The case is nice and thick. It's not going to break easily. The tooling looks good and both halves mate nicely together. I'm not sure what the plastic is, although I do suspect ABS. There are no stamps or other markings. The main screws are self-tapped into the plastic, but the battery compartment has a brass insert and machine screw, which is a nice touch. Everything is just held in place, and all is done so quite well. No rattles and everything feels fairly secure.
On to the hardware.
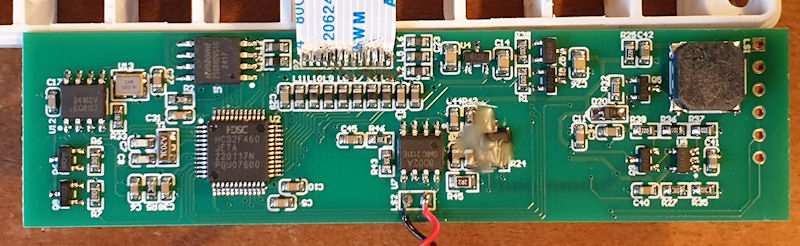
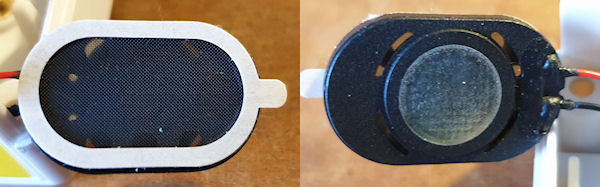
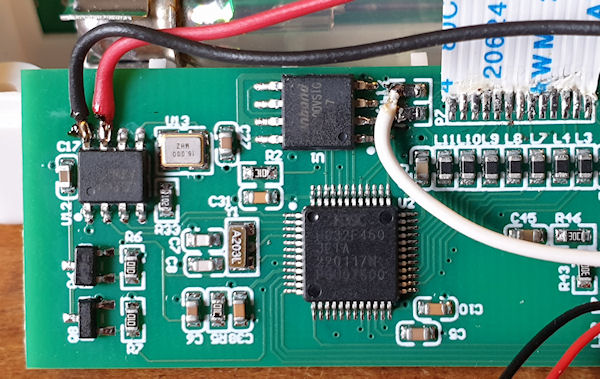
Nice. It is really quite nice. It has been very well thought out and done properly. It even has two fuses, one for the battery and one for the USB C. Fuses, on the power rails of a £27 China Express Geiger counter? Unheard of, at least to me. The PSU and MCU/logic are separated on two boards. The MCU/logic is at the front and has the screen and buttons on the reverse side, and on the main side there is (going from left to right as per picture) the BLE IC (8 pin SOP) and ancillary components. Then next (lower) is the MCU, an ARM Cortex-M4. Above that is an 8Mbit flash memory. To the right of the MCU is an audio amplifier for the clicky speaker. Then further right are some logic bits and pieces that look to turn the clicks, bleeper and display on and off, maybe. Then finally in the top right corner is a beeper/sounder. It has a programming header, all nicely labelled, and the small speaker is attached to the red and black wires.
Now comes a really interesting thing..... The counter has a speaker, and a beeper. The clicks come from the speaker, and the key press beeps and alarms come from the beeper. I don't know yet if the clicks are generated from the PSU board or the MCU, then through the amp IC to the speaker. However it is done it gives a really nice old school proper click. It really sounds like a good vintage counter clicking away. It's that nice I took pleasure in recording it - here . After checking the voltage I noticed the tone of the clicks would change slightly when I touched the probes onto the tube contacts, so the clicks must be generated from the PSU/detection circuit and not the MCU. That's just gravey.
Download an MP3 of the clicks here: https://www.schmoozie.co.uk/download/ygr01_clicks.mp3
It looks to have some decent suppression and decoupling all over, but sadly the soldering on the ribbon leaves a lot to be desired. This may have been a returned unit, and the ribbon is the repair. This works well though.
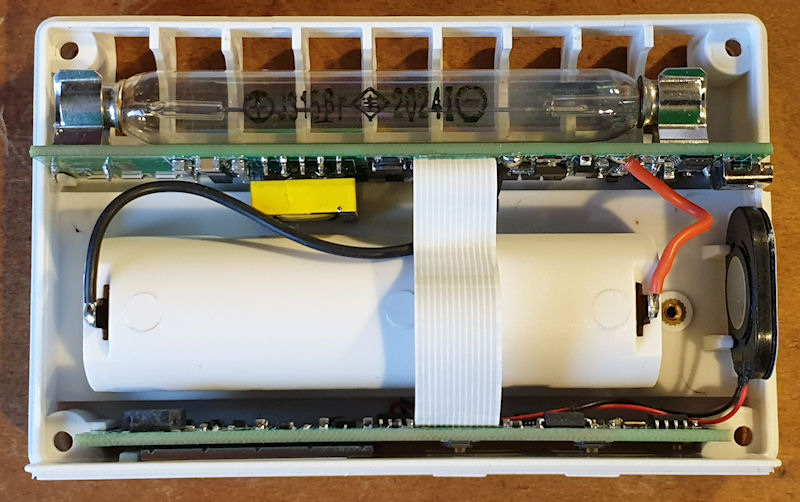
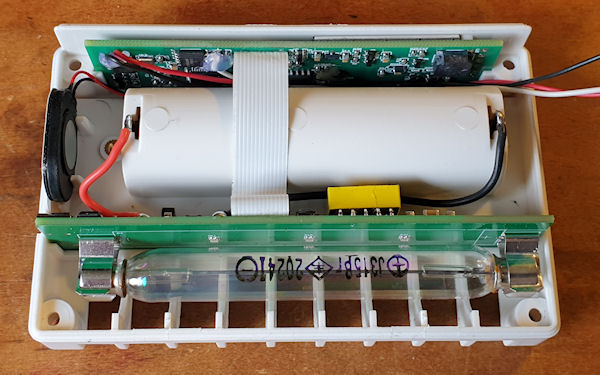
On to the HV PSU board, with that big yellow and grey hunking flyback(?) transformer. The battery wires are nice and thick. They will carry some current. It's good that it has fuses. Again the ribbon isn't nice, looking like the bottom of a dress stuck out of a car door after 60 miles in the rain, and the soldering looks, meh. But is works, and it was only £27! The GM tube is on the reverse of the PSU along with three RGB LEDs.
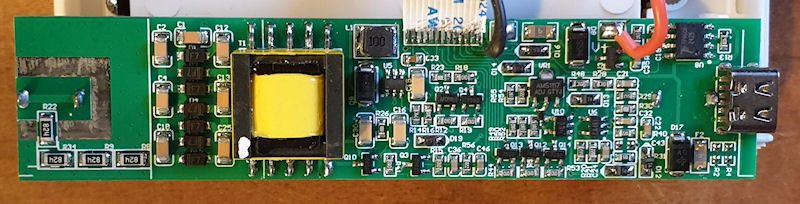
Going from right to left this time on the HV PSU board there is the USB C connector and what I think is the BMS IC (battery management), with ancillary components. Then a voltage regulator which is adjustable, so I would have to check with a meter what the voltage is. I suspect 3.3v for the logic board. There are some other switching ICs and bits and bobs and probably the detection circuit. Just to the right top of the transformer it looks like a boost circuit, possibly providing a boosted voltage to the transformer. Below that are a couple of FETs/transistors that I think are used for switching the transformer. Then we have the transformer, and to the left of that a nicely laid out voltage doubler to boost the output of the transformer. Finally the anode resistor array. 4x 820k resistors in series making a 3.28M anode resistance. This seems a touch low to me, but it works.
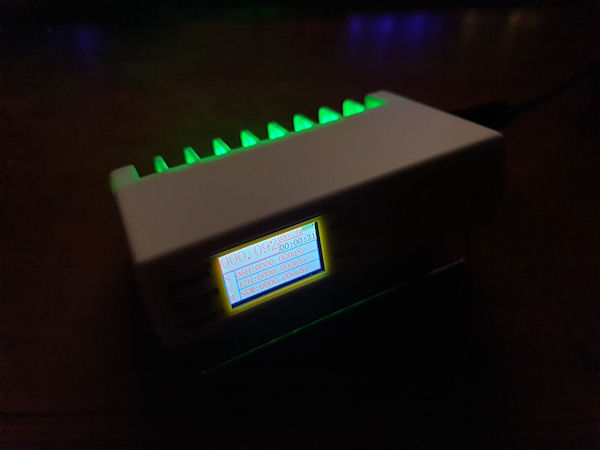
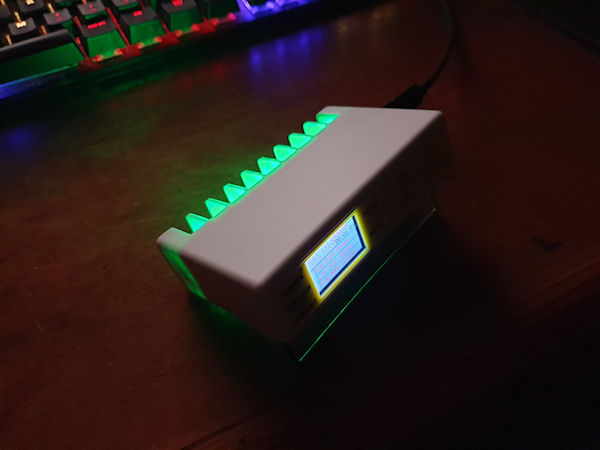
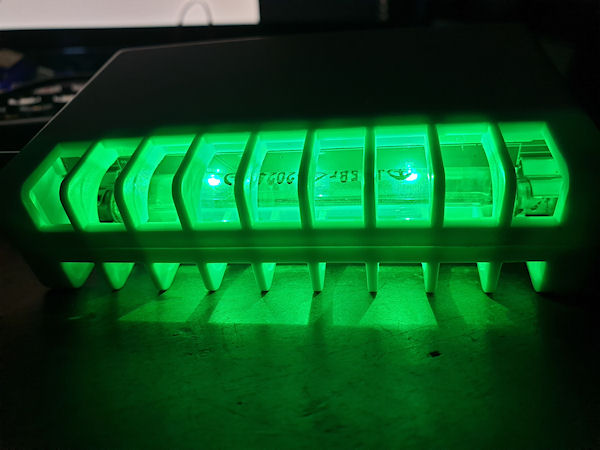
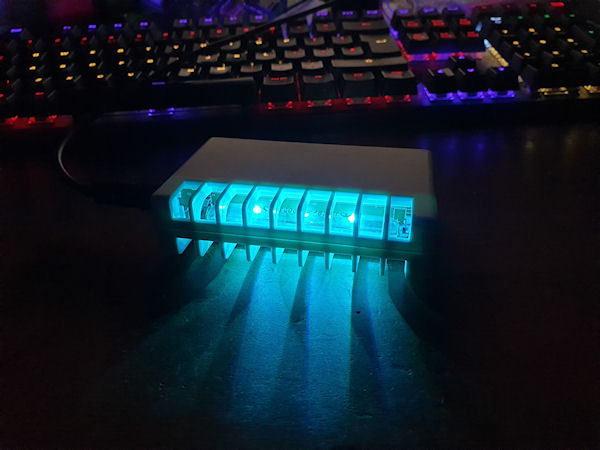
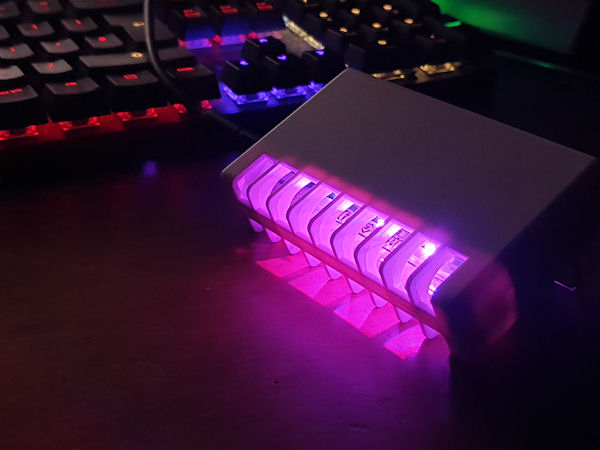
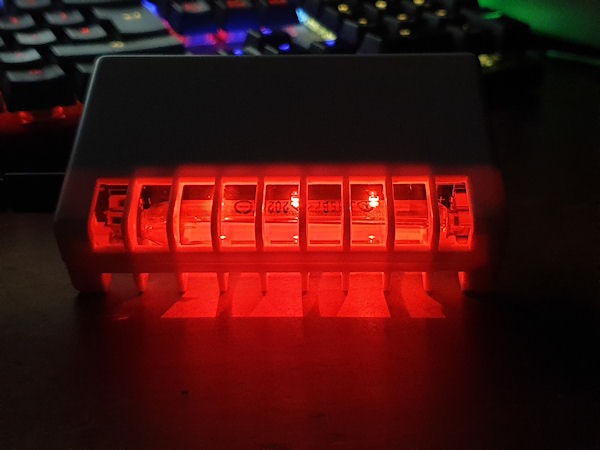
At the rear, under the tubes are the 3 RGB LEDs, which can be set to a specific RGB value and brightness. Pictures can be seen below at the bottom of the post. It doesn't cycle, sadly, or flash like a disco. I don't think it does anything when the alarms go off, but I haven't tried that. I suspect not and that it is just a quirky feature of this insanely cheap but kind of adorable counter. When I was playing with the RGB settings it kept crashing and rebooting. I found that I had to change just one of the R, G, B or brightness values, then save it, then go back in again and do the next. If i set one value then moved onto the next, that is when it would crash, ish.
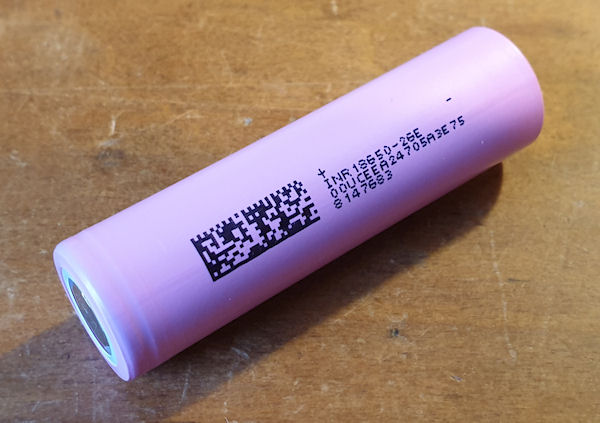
It came with the battery already fitted, and no battery warning stickers on the packaging. Not that I am bothered by that, but it has to be declared for the UK postal and shipping services. When I took the battery out I was surprised by its weight. It feels like a decent Samsung or LG cell, not like a cheap one that is 50% more filling and 50% less capacity. No, this one feels like a good one. The weight is generally an indication of its capacity. The heavier, the more capacity. I charged it up on an external charger, which sadly doesn't display the wattage, but it did take around 4 hours at a mix of 375mA and 750mA, which is very much like some other genuine Samsung's I have. I gave a photo of the battery label to Lala (AI) and it told me it is a genuine Samsung INR18650-26E 2600mAh
The specs of which are:
So seems like a decent battery, in a Geiger counter, for £27....
Finally on to the tube. It is a J315yb. Ever heard of it? No, I haven't either. It is very much like the J305, though I haven't measured it. Lala (AI) thinks it is a rebranded J305 or M4011 sold exclusively. It happens where the manufacturers put custom codes on products for a specific client, usually if they pay extra for it, or sometimes can be free is a large order is taken. It is light sensitive. That's something else I read about it before I bought it, and also attracted me to buy it. The manual and sales pitch state it can detect Alpha, Beta, Gamma and X-Rays. This tube can't detect Alpha, and will most likely only detect hard Beta, Gamma and X-Rays.

I checked the voltage at the tube and it was rocking ~442v, and it was stable. This seems a little high, but Lala tells me this is fine and the tube should be good for up to 450v, with an anode resistor of 3-5M. Its right at the top end and a little high for my liking. I don't know if it is adjustable. I haven't found any config or hidden menus. I noticed something a little odd, the ~442v was when it was in low power mode, but when in normal mode it went up to ~455v. Again, on the high side. But it works.
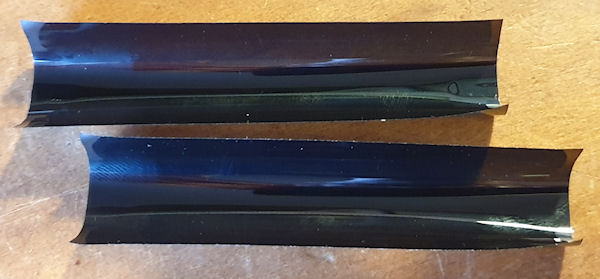
The tube is covered by two pieces of black semi opaque plastic film. This is to block out the light, and it does seem to work. However, with the plastic film fitted over the tube to block any light getting in, it also blocks the RGB LEDs from being seen.
 The plastic film will have been added to later models after it was realised that sitting it on a windowsill will drive it nuts.
My final thoughts. I like it, a lot. So much I bought another one and wrote this lengthy review. Should you have one? Yes. If you are into Geiger counters and have some cash spare, you should get one. It is a very cheap counter, with a relatively cheap tube, but has all of the right junk in all the right places. It is well thought out and executed. It has a nice high voltage power supply, good MCU and good firmware (on the face of it, despite the RGB setting crash). The power/charging and BMS all look proper. Groovy RGB mood lighting to create an ambiance where it sits. What's not to love about it? I'm just surprised that this level of quality and BoM can be had for just £27. You would spend maybe £18 on a tube, £3 on the battery, that means the counter is only an additional £6, for all that and the big hunking transformer. Kind of nuts, but I like it!
Oh, it looks entirely hackable having the programming header, much like gissio did with the FNIRSI GC-01, FS2011 and other cheap Chinese counters. I wouldn't know where to start with that, so I'll leave that to the cool kids.
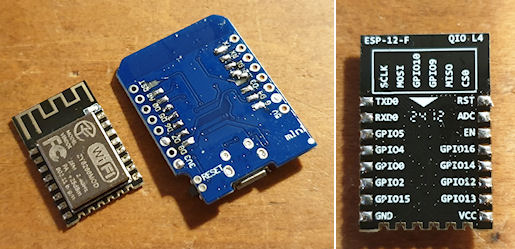
Oh, oh, The reason I bought another one is so I can keep one original, for my collection, and the other is destined for shoehorning an ESP8266 inside. A Wemos D1 Mini is too big to fit, so I have ordered some of the ESP-12 modules (same as the D1 Mini, AFAIK) and a programmer, and if I can manage to get just the module working, I should be able to run ESPGeiger on it. If that all works, I want it to run ESPGeiger when on USB, and not power the ESP when on battery. I should be able to do this by taking the 5v from the USB C, then regulate it down to 3.3v for the ESP-12 module. That's the plan anyway!
Get one here: https://vi.aliexpress.com/item/1005007763140078.html
Big bunch of hires pictures here: https://www.schmoozie.co.uk/download/yrg01.zip
Youtube video of it's operation here:
Lastly, some cool ambient mood lighting, from a Geiger counter.


I bought another cheap Chinese counter from Aliexpress and I am impressed, especially for the price of £27 shipped to my door. Despite its cheap appearance it actually offers a lot of bang for buck. I haven't looked into it closely, but there seems to be a lot of attention to detail, and I reckon whoever designed this really gave a damn about it.
It came up in suggested products on Aliexpress and I wouldn't have bothered about it if not for the fact that someone reviewed it and posted pictures of its insides. "Okay, a glass tube... Ooh a separate PSU board with a big hunking transformer on it, a proper speaker? Full colour display and an 18650 battery? For £27?" Click, click, bought!
First impressions when I opened the box were..... It's tiny! It is small. Smaller than I expected. Too small to fit a SBM-20 tube in it, so the glass one will be staying for a while. This has some neat features, some of which the other cheap Chinese counters should, or could have had. You can select between different units - CPS, CPM, uSv/h, uR/h. It can display the average dose, accumulated dose and the minimum and maximum dose. It has a clock (which sadly is not battery backed, so does reset when removing the battery) and it also has a data logging capability of recording for about 170 days at (AFAIK) 1 minute intervals.
It has BLE, but no app, so not sure about that.
Another neat feature, often not seen on cheap counters, is its low power mode. According to the manual (more on that later too) the low power mode consumption is ≥11mA. That's not bad. Running from a 2000mAh battery it should last around 180 hours / 7.6 days. That's a far cry from the 24 hours max I get from my pen type counter. You can also run it from USB C, and charge the battery. When it is in low power mode it turns off the display, the RGB LEDs and also the BLE, so is simply counting and logging. Pressing any button wakes it back up again.
The data logging feature is nice, but a bit awkward to navigate, and viewing the charts on the tiny screen requires my strongest reading glasses. The days, months and years don't roll over either, so if you are going through the logs, hour by hour it doesn't roll over to the next day, and you have to select that day, then back to hours, scroll again, then select the next day, or month, year etc. So it's all a bit cumbersome. It is ideal though for just going to a specific day to view that day's data. Interestingly, this unit came with the memory already filled, or at least a fair amount of it. It doesn't look like this unit has been used before at all, so may have been some way of testing the flash memory, by filling it up somehow, but wasn't deleted. Or it is a returns unit in a new case. Whatever it is, I'm not bothered.
The display is quite basic, and the tiny text can be a little hard to read. The menus are fairly intuitive and easy to get to grips with. Again, navigation and selection are awkward, but after messing with it a bit, you do get the hang of it.
The instructions (attached to the bottom of this post) are completely in Chinese so I had to work out how to use the counter by just pushing buttons, and within half an hour or so I had it all worked out.
The case is nice and thick. It's not going to break easily. The tooling looks good and both halves mate nicely together. I'm not sure what the plastic is, although I do suspect ABS. There are no stamps or other markings. The main screws are self-tapped into the plastic, but the battery compartment has a brass insert and machine screw, which is a nice touch. Everything is just held in place, and all is done so quite well. No rattles and everything feels fairly secure.
On to the hardware.
Nice. It is really quite nice. It has been very well thought out and done properly. It even has two fuses, one for the battery and one for the USB C. Fuses, on the power rails of a £27 China Express Geiger counter? Unheard of, at least to me. The PSU and MCU/logic are separated on two boards. The MCU/logic is at the front and has the screen and buttons on the reverse side, and on the main side there is (going from left to right as per picture) the BLE IC (8 pin SOP) and ancillary components. Then next (lower) is the MCU, an ARM Cortex-M4. Above that is an 8Mbit flash memory. To the right of the MCU is an audio amplifier for the clicky speaker. Then further right are some logic bits and pieces that look to turn the clicks, bleeper and display on and off, maybe. Then finally in the top right corner is a beeper/sounder. It has a programming header, all nicely labelled, and the small speaker is attached to the red and black wires.
Now comes a really interesting thing..... The counter has a speaker, and a beeper. The clicks come from the speaker, and the key press beeps and alarms come from the beeper. I don't know yet if the clicks are generated from the PSU board or the MCU, then through the amp IC to the speaker. However it is done it gives a really nice old school proper click. It really sounds like a good vintage counter clicking away. It's that nice I took pleasure in recording it - here . After checking the voltage I noticed the tone of the clicks would change slightly when I touched the probes onto the tube contacts, so the clicks must be generated from the PSU/detection circuit and not the MCU. That's just gravey.
Download an MP3 of the clicks here: https://www.schmoozie.co.uk/download/ygr01_clicks.mp3
It looks to have some decent suppression and decoupling all over, but sadly the soldering on the ribbon leaves a lot to be desired. This may have been a returned unit, and the ribbon is the repair. This works well though.
On to the HV PSU board, with that big yellow and grey hunking flyback(?) transformer. The battery wires are nice and thick. They will carry some current. It's good that it has fuses. Again the ribbon isn't nice, looking like the bottom of a dress stuck out of a car door after 60 miles in the rain, and the soldering looks, meh. But is works, and it was only £27! The GM tube is on the reverse of the PSU along with three RGB LEDs.
Going from right to left this time on the HV PSU board there is the USB C connector and what I think is the BMS IC (battery management), with ancillary components. Then a voltage regulator which is adjustable, so I would have to check with a meter what the voltage is. I suspect 3.3v for the logic board. There are some other switching ICs and bits and bobs and probably the detection circuit. Just to the right top of the transformer it looks like a boost circuit, possibly providing a boosted voltage to the transformer. Below that are a couple of FETs/transistors that I think are used for switching the transformer. Then we have the transformer, and to the left of that a nicely laid out voltage doubler to boost the output of the transformer. Finally the anode resistor array. 4x 820k resistors in series making a 3.28M anode resistance. This seems a touch low to me, but it works.
At the rear, under the tubes are the 3 RGB LEDs, which can be set to a specific RGB value and brightness. Pictures can be seen below at the bottom of the post. It doesn't cycle, sadly, or flash like a disco. I don't think it does anything when the alarms go off, but I haven't tried that. I suspect not and that it is just a quirky feature of this insanely cheap but kind of adorable counter. When I was playing with the RGB settings it kept crashing and rebooting. I found that I had to change just one of the R, G, B or brightness values, then save it, then go back in again and do the next. If i set one value then moved onto the next, that is when it would crash, ish.
It came with the battery already fitted, and no battery warning stickers on the packaging. Not that I am bothered by that, but it has to be declared for the UK postal and shipping services. When I took the battery out I was surprised by its weight. It feels like a decent Samsung or LG cell, not like a cheap one that is 50% more filling and 50% less capacity. No, this one feels like a good one. The weight is generally an indication of its capacity. The heavier, the more capacity. I charged it up on an external charger, which sadly doesn't display the wattage, but it did take around 4 hours at a mix of 375mA and 750mA, which is very much like some other genuine Samsung's I have. I gave a photo of the battery label to Lala (AI) and it told me it is a genuine Samsung INR18650-26E 2600mAh
The specs of which are:
- Manufacturer: Samsung SDI
- Cell Type: Lithium-ion (LiNiCoMnO2 – NCM chemistry)
- Nominal Voltage: 3.6V
- Capacity (typical): 2600 mAh
- Max Continuous Discharge: 5.2A
- Charge Voltage: 4.2V max
- Charge Current (recommended): ~1.3A
- Standard Discharge Cutoff: 2.5V
So seems like a decent battery, in a Geiger counter, for £27....
Finally on to the tube. It is a J315yb. Ever heard of it? No, I haven't either. It is very much like the J305, though I haven't measured it. Lala (AI) thinks it is a rebranded J305 or M4011 sold exclusively. It happens where the manufacturers put custom codes on products for a specific client, usually if they pay extra for it, or sometimes can be free is a large order is taken. It is light sensitive. That's something else I read about it before I bought it, and also attracted me to buy it. The manual and sales pitch state it can detect Alpha, Beta, Gamma and X-Rays. This tube can't detect Alpha, and will most likely only detect hard Beta, Gamma and X-Rays.
I checked the voltage at the tube and it was rocking ~442v, and it was stable. This seems a little high, but Lala tells me this is fine and the tube should be good for up to 450v, with an anode resistor of 3-5M. Its right at the top end and a little high for my liking. I don't know if it is adjustable. I haven't found any config or hidden menus. I noticed something a little odd, the ~442v was when it was in low power mode, but when in normal mode it went up to ~455v. Again, on the high side. But it works.
The tube is covered by two pieces of black semi opaque plastic film. This is to block out the light, and it does seem to work. However, with the plastic film fitted over the tube to block any light getting in, it also blocks the RGB LEDs from being seen.
My final thoughts. I like it, a lot. So much I bought another one and wrote this lengthy review. Should you have one? Yes. If you are into Geiger counters and have some cash spare, you should get one. It is a very cheap counter, with a relatively cheap tube, but has all of the right junk in all the right places. It is well thought out and executed. It has a nice high voltage power supply, good MCU and good firmware (on the face of it, despite the RGB setting crash). The power/charging and BMS all look proper. Groovy RGB mood lighting to create an ambiance where it sits. What's not to love about it? I'm just surprised that this level of quality and BoM can be had for just £27. You would spend maybe £18 on a tube, £3 on the battery, that means the counter is only an additional £6, for all that and the big hunking transformer. Kind of nuts, but I like it!
Oh, it looks entirely hackable having the programming header, much like gissio did with the FNIRSI GC-01, FS2011 and other cheap Chinese counters. I wouldn't know where to start with that, so I'll leave that to the cool kids.
Oh, oh, The reason I bought another one is so I can keep one original, for my collection, and the other is destined for shoehorning an ESP8266 inside. A Wemos D1 Mini is too big to fit, so I have ordered some of the ESP-12 modules (same as the D1 Mini, AFAIK) and a programmer, and if I can manage to get just the module working, I should be able to run ESPGeiger on it. If that all works, I want it to run ESPGeiger when on USB, and not power the ESP when on battery. I should be able to do this by taking the 5v from the USB C, then regulate it down to 3.3v for the ESP-12 module. That's the plan anyway!
Get one here: https://vi.aliexpress.com/item/1005007763140078.html
Big bunch of hires pictures here: https://www.schmoozie.co.uk/download/yrg01.zip
Youtube video of it's operation here:
Lastly, some cool ambient mood lighting, from a Geiger counter.

Last edit: 1 year 2 months ago by Simomax.
The following user(s) said Thank You: brencooney
Please Log in or Create an account to join the conversation.
- ChrisLX200
-

- Offline
- Elite Member
-

Less
More
- Posts: 161
- Thank you received: 8
1 year 2 months ago #7324
by ChrisLX200
Replied by ChrisLX200 on topic A little gem - The Yaorea YRG01 (Review)
Very nice and.. how much was it again? lol! I was quoted £26 on the account I use most, £22 as a welcome deal on another. It looks like a 4011/321 tube and not much like the J305b's that I have but we know the Chinese are quite flexible in their product naming conventions so it could be anything. It does need an interface to get data out though, or you could use a pulse output into a 555 circuit or even audio into something like PRA. Have to be careful what voltage you put into the 8266 though (but you already know that!)
I'm saving my pennies to buy a new laser cutter/engraver - the Sculpfun SF-A9 40W diode machine. Maybe at the end of the month... Prices keep going up and down but no matter the asking price it always ~50% off! At least it will be less than US citizens would have to pay <snigger>.
I'm saving my pennies to buy a new laser cutter/engraver - the Sculpfun SF-A9 40W diode machine. Maybe at the end of the month... Prices keep going up and down but no matter the asking price it always ~50% off! At least it will be less than US citizens would have to pay <snigger>.
Please Log in or Create an account to join the conversation.
1 year 2 months ago - 1 year 2 months ago #7325
by Simomax
Replied by Simomax on topic A little gem - The Yaorea YRG01 (Review & Mod)
I should be able to pick up the pulse right at the MCU. Simply find it and tap off into the ESP8266. I did the same to a Gamma Scout,
here
.
Here's an interesting thought; I could maybe disable the BLE and use it's (assumed) 3.3v feed to run the ESP8266. That way when the unit was in low power mode, the ESP8266 would be off, and running normally it would power the ESP8266. I could also use the menu to disable it. I'll have to probe the board and see what I can find.
Here's an interesting thought; I could maybe disable the BLE and use it's (assumed) 3.3v feed to run the ESP8266. That way when the unit was in low power mode, the ESP8266 would be off, and running normally it would power the ESP8266. I could also use the menu to disable it. I'll have to probe the board and see what I can find.
Last edit: 1 year 2 months ago by Simomax.
Please Log in or Create an account to join the conversation.
1 year 2 months ago - 1 year 2 months ago #7326
by Simomax
Replied by Simomax on topic A little gem - The Yaorea YRG01 (Review & Mod)
Dimensions of the tube are 90mm length, 10.7mm diameter and the effective length is ~65mm. This fits with the same dimensions as the M4011/J321. I think the screen is a RGB TFT with led backlight. It has a metal shield around the outside which I have only seen on LCDs to stop the light escaping and maybe reflect a bit back in.
Last edit: 1 year 2 months ago by Simomax.
Please Log in or Create an account to join the conversation.
1 year 2 months ago - 1 year 2 months ago #7329
by Simomax
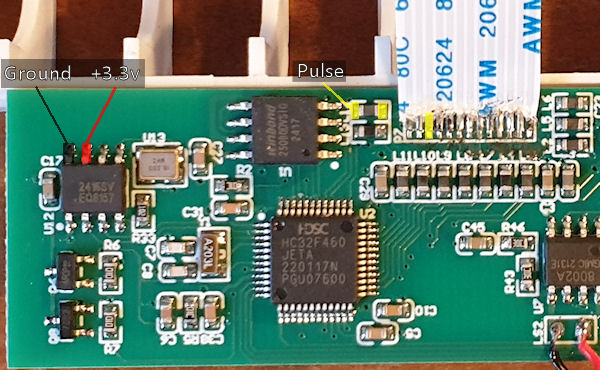
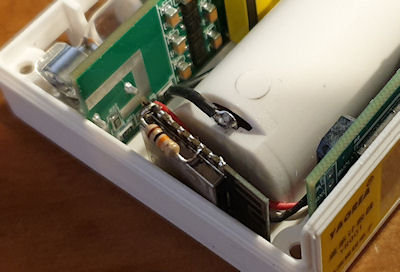
I couldn't wait to tinker with this so I decided to mod this in lieu of getting the ESP-12 modules and programmer. Using a scope I found the connection points I needed, Soldered some wires on. Soldered a Wemos D1 Mini clone on the other end, installed ESPGeiger 0.7.0, and boom! Literally as simple as that. Using the scope I checked the ribbon cable pins one by one and found the pulse coming from the PSU board. I didn't want to solder right on the ribbon, it looks janky already, so probed about and found that it is connected to L12. The MCU side of the inductor is where I soldered the pulse wire to - marked in yellow in the picture. Then I found the +3.3v supply to the BLE IC and verified it turns on and off with the BLE, and found a ground next to it. They are the power for the ESP8266, and when BLE is on, so is the ESP8266, and off when the BLE is off. I left the BLE working in case it comes in useful in the future. Then secured the wires with a bit of hot glue and put the case back together. And now it works well with ESPGeiger.
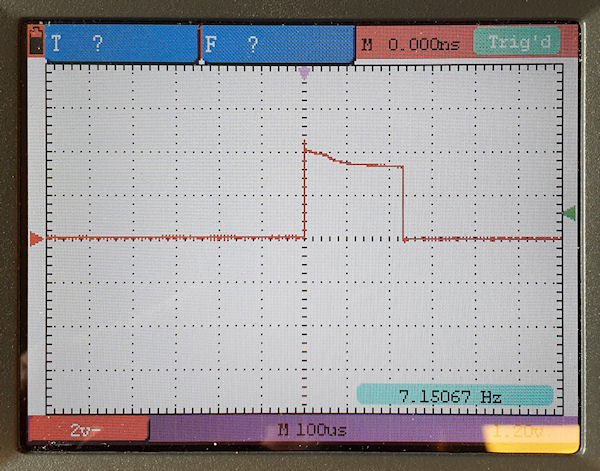
The pulse is nice and clean, but a little long at ~230uS. This should give a theoretical max of ~4348 cps / ~260,870 cpm, so will be fine


A little hot glue to secure the wires.
And the wires tucked in neatly at the bottom.
I've configured it and is now uploading to Radmon: https://radmon.org/index.php?option=com_content&view=article&id=30&station=zzzzz_simomax_test
It appears to be working well. It will run from the battery too, so I guess if a mobile phone ran a hot spot, it could be a completely mobile unit. No GPS though, but that could be added!

Replied by Simomax on topic A little gem - The Yaorea YRG01 (Review & Mod)
I couldn't wait to tinker with this so I decided to mod this in lieu of getting the ESP-12 modules and programmer. Using a scope I found the connection points I needed, Soldered some wires on. Soldered a Wemos D1 Mini clone on the other end, installed ESPGeiger 0.7.0, and boom! Literally as simple as that. Using the scope I checked the ribbon cable pins one by one and found the pulse coming from the PSU board. I didn't want to solder right on the ribbon, it looks janky already, so probed about and found that it is connected to L12. The MCU side of the inductor is where I soldered the pulse wire to - marked in yellow in the picture. Then I found the +3.3v supply to the BLE IC and verified it turns on and off with the BLE, and found a ground next to it. They are the power for the ESP8266, and when BLE is on, so is the ESP8266, and off when the BLE is off. I left the BLE working in case it comes in useful in the future. Then secured the wires with a bit of hot glue and put the case back together. And now it works well with ESPGeiger.
The pulse is nice and clean, but a little long at ~230uS. This should give a theoretical max of ~4348 cps / ~260,870 cpm, so will be fine
A little hot glue to secure the wires.
And the wires tucked in neatly at the bottom.
I've configured it and is now uploading to Radmon: https://radmon.org/index.php?option=com_content&view=article&id=30&station=zzzzz_simomax_test
Attachments:
Last edit: 1 year 2 months ago by Simomax.
Please Log in or Create an account to join the conversation.
1 year 2 months ago - 1 year 2 months ago #7331
by Simomax
Replied by Simomax on topic A little gem - The Yaorea YRG01 (Review & Mod)
Again, I couldn't leave it alone. I wasn't happy seeing the wires coming out of it's side, so I had a go at desoldering the ESP-12 module off of the Wemos board and succeeded without destroying it!
I then connected the there wires and powered on. The ESP was dead. Looking ta the circuit diagram there are some pull-up and pull-down resistors. Researching this I found that EN has to be high and GPIO15 has to be pulled down to ground to enable boot from flash. I added a couple of resistors for this and it booted fine.
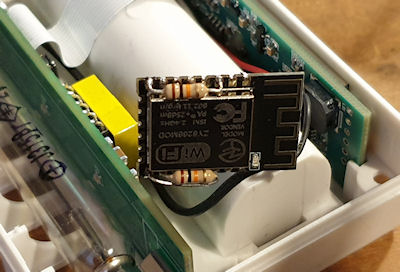
So I tucked it in and closed up the case. Job done, and by looking you can't tell.
It works alongside the BLE, so if I want the ESP off I turn BLE off, and vice versa. I'm quite pleased with the end result.
I also worked out that the conversion factor programmed into the YGR01 is 151, or 0.0066225.
I then connected the there wires and powered on. The ESP was dead. Looking ta the circuit diagram there are some pull-up and pull-down resistors. Researching this I found that EN has to be high and GPIO15 has to be pulled down to ground to enable boot from flash. I added a couple of resistors for this and it booted fine.
So I tucked it in and closed up the case. Job done, and by looking you can't tell.
It works alongside the BLE, so if I want the ESP off I turn BLE off, and vice versa. I'm quite pleased with the end result.
I also worked out that the conversion factor programmed into the YGR01 is 151, or 0.0066225.
Attachments:
Last edit: 1 year 2 months ago by Simomax.
The following user(s) said Thank You: BE_Soignies_GDK101
Please Log in or Create an account to join the conversation.
Moderators: Gamma-Man
- Forum
- Geiger counter discussions
- Commericial geiger counters
- A little gem - The Yaorea YRG01 (Review & Mod)
Time to create page: 0.496 seconds