
- Forum
- Software discussions
- Arduino Code
- ESP8266 - Wemos D1 Mini - Arduino Code - Bare-bones code, verified working
ESP8266 - Wemos D1 Mini - Arduino Code - Bare-bones code, verified working
4 years 4 months ago - 3 years 5 months ago #6036
by Simomax
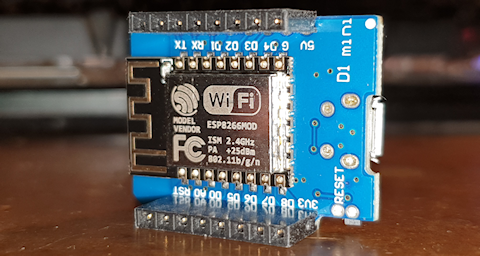 Here is some Arduino code for the ESP8266 written and tested on a Wemos D1 Mini. This is bare-bones code only. It does only these things: receives pulses on GPIO 13 (physical pin D7 on Wemos D1 Mini), calculates CPM and submits it to Radmon.org (via WiFi) every 60 seconds. It has a little debugging that can print to serial, flashes the internal LED when an interrupt event is detected and I have also added CPM print to serial (much like the NetIO GC-10) that can be used with the Radlog windows logging software - and that is it. Nothing more, nothing less. It works. I used the custom code I had previously written for my GK Radmon which has been running nicely for a while now, and chopped it right down to the nuts and bolts.
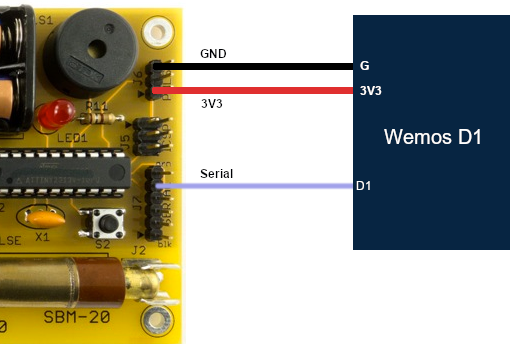
To use this you simply connect GPIO 13 to your Geiger detector, load the code and change your WiFi SSID and password and your Radmon.org username and submission password, and that is all.
NOTE: Make sure the pulses coming from your detector are logic level <= 5v or you may destroy your ESP8266, or damage your detector circuit, or both. In testing I used my Geiger Counter development (bread)board which is basically a copy of an early GK geiger counter (thank you Brohogan for making it open source - much appreciated!) You may need additional electronics to interface your detector to the ESP8266 which is not covered here.
Here is the code:
When running properly you should see it startup and start to detect events in the debug log like this:
And when it comes to submit the CPM to Radmon.org, you should see this in the debug log:
If all is well and you want to use the serial CPM output then simply turn off debugging (debug = false) and enable the printCPM (printCPM = true). You will then get a serial output that can be used with other equipment, or the Radlog windows software, and should look like this:
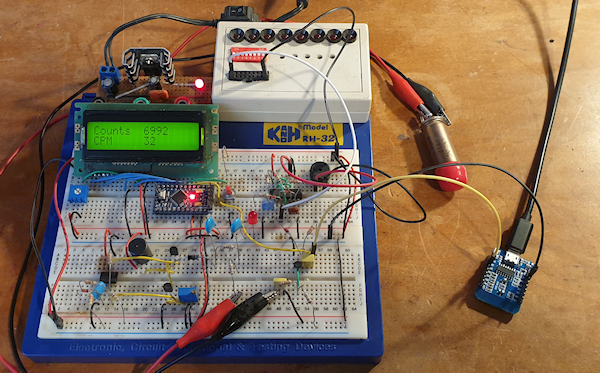
And finally, this is what I used to write and test the code with.
I hope this is of use and I think plugs a hole in the available Radmon.org software for submission as the old Arduino code is for older hardware. I think the old WizNET ethernet shield. That old code will not run on an ESP8266. I suspect with very little modification this should work on a ESP32 as well.
Happy Geigering!
To use this you simply connect GPIO 13 to your Geiger detector, load the code and change your WiFi SSID and password and your Radmon.org username and submission password, and that is all.
NOTE: Make sure the pulses coming from your detector are logic level <= 5v or you may destroy your ESP8266, or damage your detector circuit, or both. In testing I used my Geiger Counter development (bread)board which is basically a copy of an early GK geiger counter (thank you Brohogan for making it open source - much appreciated!) You may need additional electronics to interface your detector to the ESP8266 which is not covered here.
Here is the code:
/*
  -----------------------------------------------------------------------------------------------------------------------------------------------------------------------------------------------------------
  | ArduinoBB Wemos Butterfly 1.01                                                                                                                                                                          |
  | Bare-bones Arduino counter for Geiger counter and submission to Radmon.org written by Simomax.                                                                                                          |
  | This code was taken from a working project with all of the other code chopped out to give very basic Radmon.org CPM submission.                                                                         |
  | This is very basic code. It will detect pulses on GPIO 13 (pin D7 on Wemos D1 Mini) and calculate the CPM every second. It will then submit the CPM to Radmon.org every 60 seconds.                     |
  | It has a debug option and also option to print the CPM to serial every second, much like the NetIO- GC-10, which can also be used with the Radlog windows software.                                     |
  |                                                                                                                                                                                                         |
  | You are free to do anything you want with this code. There is no license. You are allowed to use/copy/change/share the code without having to attribute myself,                                         |
  | although it would be appreciated if you did. You are also free to use this in any commercial setting.                                                                                                   |
  | Radmon.org is free and always has been and in that sentiment, so is this code, as is all of my code that I share on the Radmon.org forums unless specifically stated.                                   |
  | If you would like to give something back then please consider a small donation to Radmon.org   (which I ahve no affiliation with whatsoever, ecxept from being a user and contributor                   |
  | to the forums) or even better, become a regular user of the Radmon.org forums. It has become a little quiet of late and some new users to the forum would be welcomed, by everyone I am sure.           |
  |                                                                                                                                                                                                         |
  | This code comes without warranty or support. I am happy to answer questions in the Radmon forums, but try and keep it within the code. I may not be able to help with your own code outside my own.     |
  | If it breaks you get to keep all the pieces!                                                                                                                                                            |
  |                                                                                                                                                                                                         |
  | Have fun and happy counting!                                                                                                                                                                            |
  | ~Simonmax                                                                                                                                                                                               |
  -----------------------------------------------------------------------------------------------------------------------------------------------------------------------------------------------------------
  Change log:
  1.00 - Initial version
  1.01 - Updated to enable compatibility with latest Arduino ESP8266 library
  */

#include <ESP8266WiFi.h>
WiFiClient client;                           // Use WiFiClient class to create TCP connections


// Your WiFi Network SSID and Password.
#define WIFI_SSID             "Your-WiFi-SSID"
#define WIFI_PASS             "Your-WiFi-Password"

// Your Radmon.org username and submission password.
const char* RadmonHost = "radmon.org";        // No need to change this
const char* UserName = "Your-Radmon.org-Username";             //Your Radmon.org user name
const char* PassWord = "Your-Radmon.org-Submission_password";          //Your Radmon.org submission password - Make sure this is the same as your 'data sending password' on your Radmon.org profile page.

// Debug - True prints information to serial.
int debug = true;

// Option to enable CPM to be printed to serial - When enables this emulates the NetIO GC-10 serial output
int printCPM = false;


// Variables used - You shouldn't need to change anything below this line unless customizing. --------------------------------------------------------------------------------
long CPM;
volatile unsigned long totalCounts = 0;       // Total counts - May be useful, but for now is only printed when debug enabled.
int cpsCount = 0;                             // Used for calculating CPM. This var counts the amount of interrupt events in one second.
int cpmArray[60];                             // Array used for storing CPS over 60 seconds. Each index equals the CPS over a given second.
int cpmArrayStep = 0;                         // Used for stepping the index of above array when calculating CPM.
static uint32_t cpsTime=millis();             // Used for the 1 second timer. We count millis in the loop as using a delay would impact other functions and delays should generally not be used.
static uint32_t cpmTime=millis();             // And another for the 60 second timer for Radmon.org submission.
int cpmMillis = 1000;                         // How often to calculate CPM (1000ms = 1 second.)
int radmonMillis = 60000;                     // How often to submit to Radmon.org (60000ms = 60 seconds.) Please don't set this to less than 60000 as recommended minimum submission time for Radmon.org is 60 seconds.
int lastConnectionAttempt = millis();
int connectionDelay = 5000;                   // Try to reconnect WiFi every 5 seconds if connection lost.


void setup()
{
  Serial.begin(9600);                         // Set serial baud rate to 9600.
  delay(500);
  pinMode(LED_BUILTIN, OUTPUT);               // Setup (internal) LED pin.
  digitalWrite(LED_BUILTIN, HIGH);            // Turn the internal LED off - The internal LED on the Wemos D1 Mini uses reversed logic, so HIGH is off and LOW is on.
  pinMode(13, INPUT_PULLUP);                  // Set pin GPIO 13 (D7 on Wemos D1 Mini) as input and enable internal pullup.

  WiFi.mode(WIFI_STA); //Set WiFi mode

  attachInterrupt(13, GetEvent, FALLING);     // Attach interrupt on GPIO 13.

  if (debug) {
    Serial.println("Running!!!!\r\n"); // ------------------------------------------------------------------------------------------------
  }
}

void updateRadmon() {                        // Send CPM to Radmon.org.
  if (debug) {
    Serial.println("\r\nUpdating Radmon...");
  }

  WiFiClient clientGet;                     // Set as client.
  const int httpGetPort = 80;

  String urlGet = "/radmon.php";            // Build the URL for Radmon.org CPM submission.
  urlGet += "?function=submit&user=";
  urlGet += UserName;
  urlGet += "&password=";
  urlGet += PassWord;
  urlGet += "&value=";
  urlGet += int(CPM);
  urlGet += "&unit=CPM";

  if (debug) {
    Serial.print(">>> Connecting to host: ");
    Serial.println(RadmonHost);
  }

  if (!clientGet.connect(RadmonHost, httpGetPort)) {  // Try and connect to Radmon.org.
    if (debug) {                                      // Connection failed!.
      Serial.print("Connection failed: ");
      Serial.println(RadmonHost);
    }

  } else {                                            // Connected - Success!
    if (debug) {
      Serial.println("Sending data....");
    }
    clientGet.println("GET " + urlGet + " HTTP/1.1"); // Send the datary goodness to Radmon.org.
    if (debug) {
      Serial.println("GET " + urlGet + " HTTP/1.1");
    }
    clientGet.print("Host: ");
    clientGet.println(RadmonHost);
    if (debug) {
      Serial.println("Host: " + String(RadmonHost));
    }
    clientGet.println("User-Agent: ArduinoBB Wemos Butterfly 1.0");
    if (debug) {
      Serial.println("User-Agent: ArduinoBB Wemos Butterfly 1.0");
    }
    clientGet.println("Connection: close\r\n\r\n");
    if (debug) {
      Serial.println("Connection: close\r\n\r\n");
    }

    unsigned long timeoutP = millis();        // We check the connection time. If longer than 10 seconds then stop the connection and exit the function - timeout.
    while (clientGet.available() == 0) {
      if (millis() - timeoutP > 10000) {
        if (debug) {
          Serial.print(">>> Client Timeout: ");
          Serial.println(RadmonHost);
        }
        clientGet.stop();
        return;
      }
    }

    if (debug) {
      Serial.println("End of sending data....\r\n\r\nResponse:"); // We didn't timeout so lets wait for a response from Radmon.org.
    }


    while (clientGet.available()) {          // We got a response so just check the 1st line of the server response. Could be expanded if needed.
      String retLine = clientGet.readStringUntil('\r');
      if (debug) {
        Serial.println(retLine);
      }
      break;
    }
  }                                         // End client connection as we are done.

  if (debug) {
    Serial.print(">>> Closing host: ");
    Serial.println(RadmonHost);
  }
  clientGet.stop();
}

void calculateCPM()                         // Calculate the CPM.
{
  if (debug) {
    Serial.print("Calculating CPM: ");
  }
  cpmArray[cpmArrayStep] = cpsCount;        // Set the index in the CPM array to that of the current CPS. The index initially starts at 0 when powered on.
  cpmArrayStep++;                           // The next index we want to record.
  if (cpmArrayStep >= 60)                   // There are 60 indexes, one for every second in a minute. If the index goes out of the bounds of our 60 indexes then cycle back to index 0.
  {
    cpmArrayStep = 0;
  }
  CPM = 0;                                  // Var used to temporarily calculate CPM.
  unsigned int i;
  for (i = 0; i < 60; i++)                  // Get the value at each index of the CPM array.
  {
    CPM += cpmArray[i];                     // Add each index together to give a total over 60 seconds.
  }
  cpsCount = 0;                             // Reset the CPS variable ready for sampling the next second.
  if (printCPM) {
    Serial.println(CPM);                    // Print the current CPM to serial every interval if enabled - Much like the NetIO GC-10.
  }
  else if (debug) {
    Serial.println(CPM);
  }
}

ICACHE_RAM_ATTR void GetEvent() {                           // ISR triggered for each new event (count).
  if (debug) {
    Serial.println("<< Got Event >>");
  }
  totalCounts ++;                           // Increase total counts each time the interrupt is fired.
  cpsCount ++;                              // Increase var each time the interrupt is fired.
  digitalWrite(LED_BUILTIN, LOW);           // flash LED as quickly as possible.
  delayMicroseconds(50);
  digitalWrite(LED_BUILTIN, HIGH);
}

void loop()
{
  if ( (millis()-cpsTime) >= cpmMillis) {        // Check our 1 second interval.
    cpsTime = millis();
    calculateCPM();                         // 1 Second has surpassed so we calculate our CPM.
  }

  if ( (millis()-cpmTime) >= radmonMillis) {        // Check our 60 second interval.
    cpmTime = millis();
    updateRadmon();                         // 60 Seconds has surpassed so we submit the CPM to Radmon.org.
  }

  if (WiFi.status() != WL_CONNECTED)        // check WiFi connection:
  {
    // (optional) "offline" part of code - you can add code here to signal when WiFi is disconnected, such as lighting an LED.
    if (millis() - lastConnectionAttempt >= connectionDelay)
    {
      lastConnectionAttempt = millis();
      if (WIFI_PASS && strlen(WIFI_PASS))   // attempt to connect to Wifi network:
      {
        WiFi.begin((char*)WIFI_SSID, (char*)WIFI_PASS);
      }
      else
      {
        WiFi.begin((char*)WIFI_SSID);
      }
    }
  }
  else
  {
    // We are connected - you can add code here to signal when WiFi is connected, such as lighting an LED.
  }
}[/i]
When running properly you should see it startup and start to detect events in the debug log like this:
Running!!!!

Calculating CPM: 0
<< Got Event >>
<< Got Event >>
Calculating CPM: 2
Calculating CPM: 2
Calculating CPM: 2
Calculating CPM: 2
Calculating CPM: 2
Calculating CPM: 2
Calculating CPM: 2
Calculating CPM: 2
Calculating CPM: 2
Calculating CPM: 2
<< Got Event >>
<< Got Event >>
Calculating CPM: 4
Calculating CPM: 4
Calculating CPM: 4
Calculating CPM: 4
<< Got Event >>
<< Got Event >>
<< Got Event >>
Calculating CPM: 7
Calculating CPM: 7
Calculating CPM: 7
Calculating CPM: 7
Calculating CPM: 7
And when it comes to submit the CPM to Radmon.org, you should see this in the debug log:
<< Got Event >>
Calculating CPM: 19
Calculating CPM: 19
Calculating CPM: 19

Updating Radmon...
>>> Connecting to host: radmon.org
Sending data....
GET /radmon.php?function=submit&user=Simomax&password=MyPassword&value=19&unit=CPM HTTP/1.1
Host: radmon.org
User-Agent: ESP8266/1.0
Connection: close


End of sending data....

Response:
HTTP/1.1 200 OK
>>> Closing host: radmon.org
Calculating CPM: 19
Calculating CPM: 19
Calculating CPM: 19
If all is well and you want to use the serial CPM output then simply turn off debugging (debug = false) and enable the printCPM (printCPM = true). You will then get a serial output that can be used with other equipment, or the Radlog windows software, and should look like this:
0
2
4
4
4
4
8
8
8
9
9
9
9
12
12
12
12
12
14
14
14
14
14
14
14
And finally, this is what I used to write and test the code with.
I hope this is of use and I think plugs a hole in the available Radmon.org software for submission as the old Arduino code is for older hardware. I think the old WizNET ethernet shield. That old code will not run on an ESP8266. I suspect with very little modification this should work on a ESP32 as well.
Happy Geigering!
Attachments:
Last edit: 3 years 5 months ago by Simomax.
The following user(s) said Thank You: Burny4600
Please Log in or Create an account to join the conversation.

4 years 3 months ago #6087
by Burny4600
Replied by Burny4600 on topic ESP8266 - Wemos D1 Mini - Arduino Code - Bare-bones code, verified working
Hello Simomax.
I discovered your instructions here on how to do the data preparation and transmission to Rademon using the ESP8266 Wemos D1 Mini.
I currently have my Migthyohm Counter connected locally via MQTT. My counter delivers the data string in this form via serial connection:
CPS, #####, CPM, #####, uSv/hr, ###.##, <mode>
My programming skills aren't the best, so I'm having problems transferring data with the Rademon interface.
I may have made mistakes here.
There is already an error in my MQTT preparation, where I cannot transfer the mode.
I have another error when transferring data to Radmon. Could you see my Arduino configuration?
Thanks
Chris
Please Log in or Create an account to join the conversation.
4 years 3 months ago #6088
by Simomax
Replied by Simomax on topic ESP8266 - Wemos D1 Mini - Arduino Code - Bare-bones code, verified working
Hi Chris,
Can you please explain some more about your setup? The Mightyohm counter uses an ATTINY micro controller that does not have WiFi capabilities, so that will never be able to send data to Radmon on it's own. Do you have an ESP8266/Wemos D1 Mini? It would be much easier to simply run a wire from the 'pulse' pin on the Mightyohm counter to D7 on the Wemos if you do have one. That would allow you to send to your local MQTT server and also send to Radmon and would require no changes to your code and simply run my code on a Wemos. That is, if you have one. Let me know a little more about your setup and I'll try to help.
Cheers
Simon
Please Log in or Create an account to join the conversation.
4 years 3 months ago - 4 years 3 months ago #6089
by Burny4600
Replied by Burny4600 on topic ESP8266 - Wemos D1 Mini - Arduino Code - Bare-bones code, verified working
Hi Simomax.
My Mightyohm Counter was connected to a Wemos D1 Mini.
I would just add the radmon part as radmon.h.
The existing scripts are the Wifi part and the MQTT part.
Attached are the existing scripts.
I imagined this as putting the radmon part in the radmon.h file, and linking that file to the base part.
The next step is to add an i2c display.
As already mentioned, I still have an error in my scripts with the mode evaluation of my counter. The part CPM, CPS and uSv/h work.

Thanks
Chris
My Mightyohm Counter was connected to a Wemos D1 Mini.
I would just add the radmon part as radmon.h.
The existing scripts are the Wifi part and the MQTT part.
Attached are the existing scripts.
I imagined this as putting the radmon part in the radmon.h file, and linking that file to the base part.
The next step is to add an i2c display.
As already mentioned, I still have an error in my scripts with the mode evaluation of my counter. The part CPM, CPS and uSv/h work.
Thanks
Chris
Attachments:
Last edit: 4 years 3 months ago by Burny4600.
Please Log in or Create an account to join the conversation.
4 years 3 months ago #6090
by Simomax
Replied by Simomax on topic ESP8266 - Wemos D1 Mini - Arduino Code - Bare-bones code, verified working
Hi Chris,
Thanks for your pictures and code. I understand now how your system works. Mightyohm counter sends serial to Wemos and then the Wemos sends to MQTT. However, what you have written for Radmon won't work. You will need to include the whole http function. I.e. all of the 'void updateRadmon()' function. You will also need to add the variables the function uses, such as the host name, user name, password etc. Also, there is nothing calling the function within the loop. You need to add some timer in the loop to call the function every x seconds. Minimum 60 seconds for Radmon. You don't really need to add the Radmon part as an include file. It could be written into the main code and then add the variables in your settings.h.
It would be quite easy for me to add the Radmon part to your code if I could test it, but I don't have a MQTT server so I wouldn't be able to test reliably. I also don't have a Mightyohm counter to supply the serial data to the Wemos which poses a challenge.
Cheers
Simon
Please Log in or Create an account to join the conversation.
4 years 3 months ago - 4 years 3 months ago #6091
by Burny4600
Replied by Burny4600 on topic ESP8266 - Wemos D1 Mini - Arduino Code - Bare-bones code, verified working
Hi SimonI understand that a function test regarding my counter is not feasible for you, but I can then do the tests on my counter.
Since I am still in the process of completing the MQTT interface and am planning to add a display, tests are not a problem.
Some information can also be found under this link.
https://myscope.net/geigerzaehler/
I implemented the serial interface with MQTT with the Wemos D1 Mini. Where I still have an error is the parameter mode over the serial interface.
The readings are passed in a simple CSV format:
Chris
Since I am still in the process of completing the MQTT interface and am planning to add a display, tests are not a problem.
Some information can also be found under this link.
https://myscope.net/geigerzaehler/
I implemented the serial interface with MQTT with the Wemos D1 Mini. Where I still have an error is the parameter mode over the serial interface.
The readings are passed in a simple CSV format:
CPS, #####, CPM, #####, uSv/hr, ###.##, <Modus>Chris
Last edit: 4 years 3 months ago by Burny4600.
Please Log in or Create an account to join the conversation.
Moderators: Gamma-Man
- Forum
- Software discussions
- Arduino Code
- ESP8266 - Wemos D1 Mini - Arduino Code - Bare-bones code, verified working
Time to create page: 0.238 seconds