
- Forum
- Geiger counter discussions
- Commericial geiger counters
- Replacing the LiPo battery on a Radiacode 101
Replacing the LiPo battery on a Radiacode 101
1 year 9 months ago #7050
by Simomax

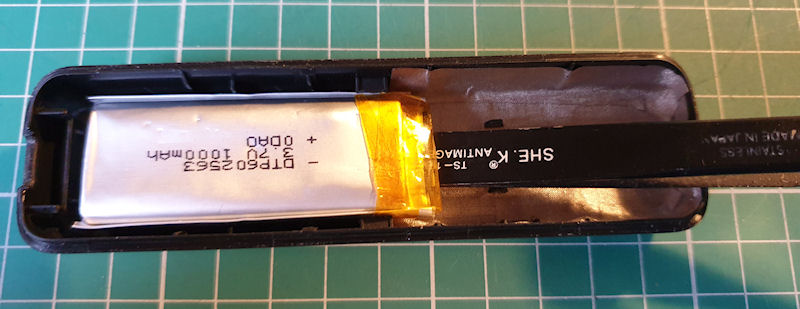
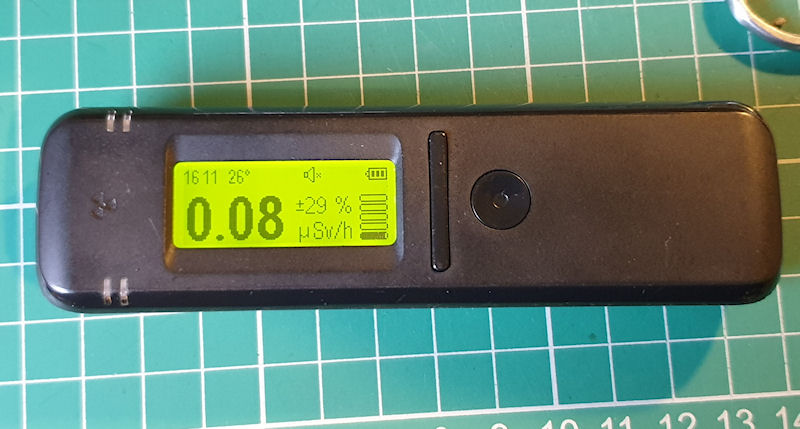
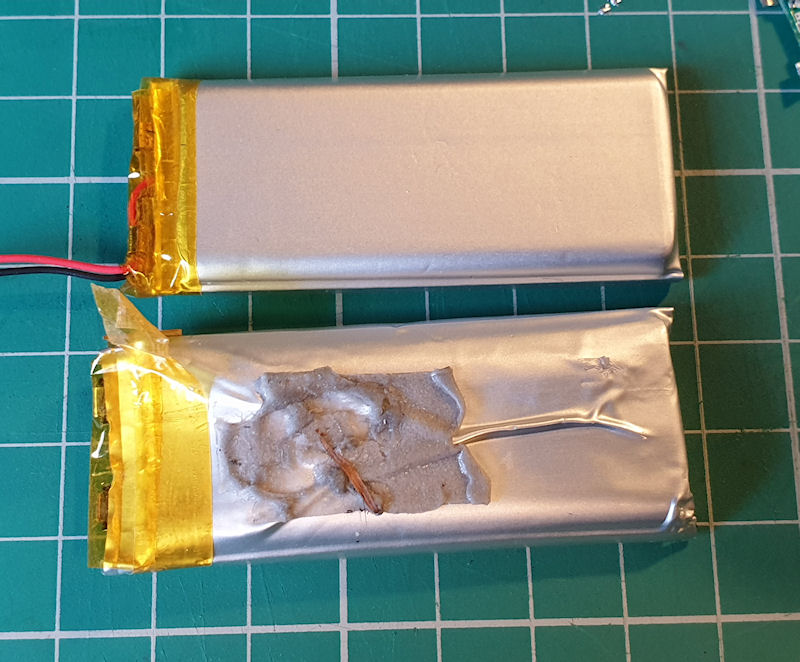
I had to replace the battery in my Radiacode 101 as it was becoming potentially dangerous. I noticed the main button on the Radiacode wasn't pressing in properly and was sticking at times, so I popped the unit open and found the battery had expanded and was putting pressure on the circuit board, and thus making the button tight. The battery hadn't expanded like other LiPo's I have had, where they become springy and spongy (gas being released into the battery packet), this had expanded and was rock hard. Iv'e never seen that before. I didn't like it, so immediately removed the battery from the device (and that was a proper load of scary fun) and put it outside. I take no chances with LiPo's when they start to expand. It is a sign that the chemicals in the battery are getting unstable and starting to off-gas. I got the Radiacode sometime in 2021 so I reckon the battery has lasted for about 3 years. It was probably at about 50-60% capacity as I was having to recharge it about every week. When I first got the unit I charged it about every two weeks. It's not done bad, but I think could have done better. I think my phone fast charger may have shortened it's life a bit and it was starting to get hotter than usual when recharging using the phone charger. I think I'll use a 500ma basic dumb charger from now on.
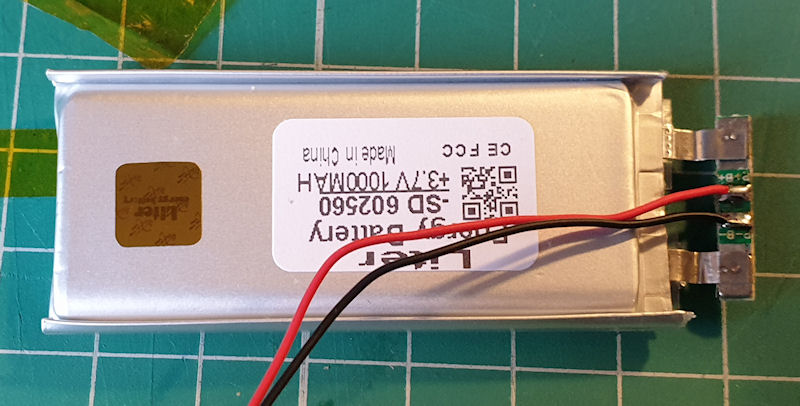
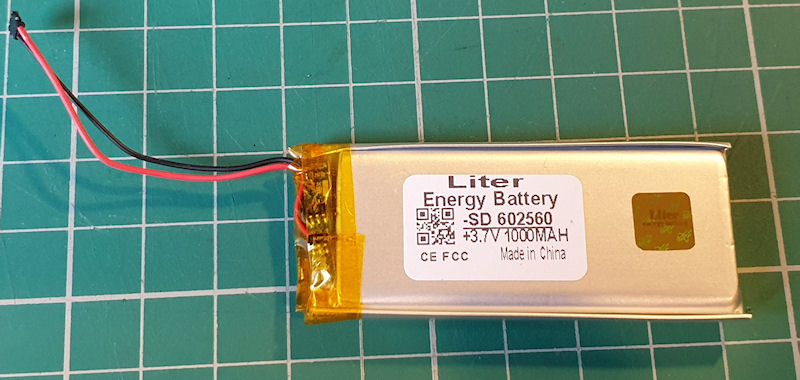
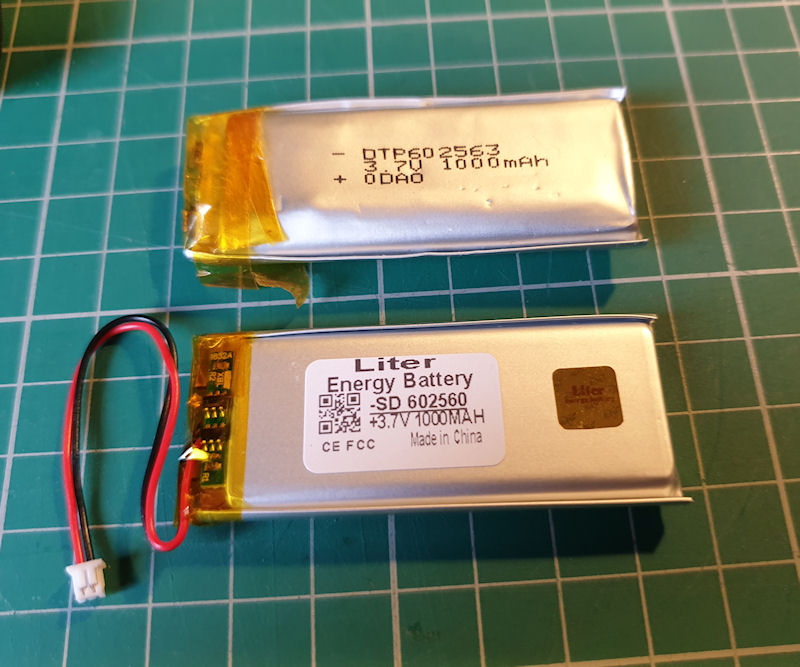
At first I couldn't find a direct drop-in replacement battery. Apparently Radiacode will sell me one but they didn't have one for sale on their store, and I couldn't be bothered waiting about for emails and stuff so I looked for an alternative, with little avail. After a little research I found that the battery number is it's dimensions, much like an 18650 cell (18mm round by 65.0mm long.) The original battery is a single cell, 1000mAh, 602563 type, and the number means 60mm length, 25mm width and 6.3mm thick. I couldn't find any battery with the number 602563, but I did find plenty that are 602560. So the same length and width and 0.3mm thinner. The battery I bought came from Ali Express here: https://www.aliexpress.com/item/1005003070400971.html
Here is a step-by-step guide on replacing the battery in a Radiacode 101. I suspect the same applies with the 102 and 103, but I can't confirm that. They appear to all be the same construction. I took the old battery out before I even ordered the new one so sadly I don't have many pictures from when I took it out. I think every Radiacode owner is going to have to do this at least once if they want their unit to last. It's one of the many pitfalls of using this kind of battery technology - it just doesn't last long. A Geiger counter should be forever, not just three years!
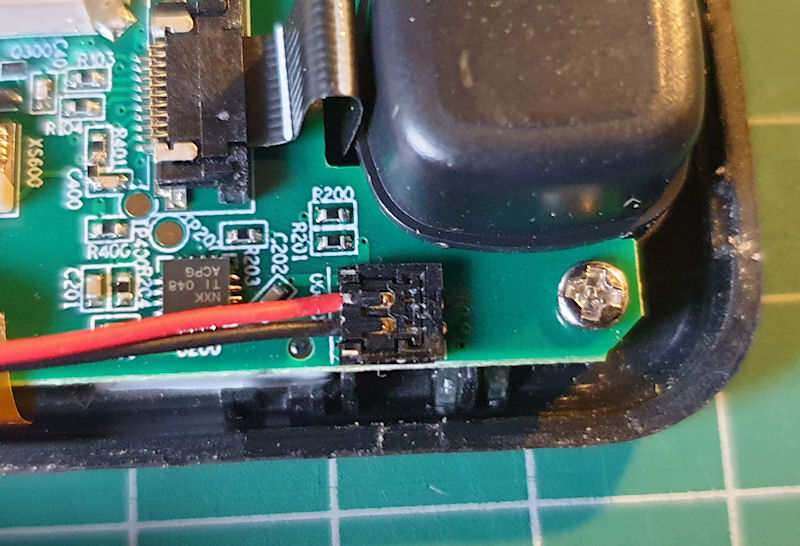
First power off and open up the Radiacode 101. The case is clipped together very much like a TV remote control so use a good spudger, and it seems easiest to start prying in the middle of the case at the sides and working towards each end. This is my favourite type of spudger for these kinds of cases (not this particular make, but this spring steel type.) Eventually it will pop open when all the clips are released. Be careful as the battery is stuck to one part of the case and the PCB the other part of the case. Once open disconnect the battery connector from the PCB by tugging gently on the cable. Then put the PCB part over to one side where it can't be knocked or damaged.
Next is removal of the old battery. Grab something hard and blunt, slide it under the bottom of the battery and start to pry it out. In all honesty this was scary and I wasn't comfortable doing this at all. But it was either grin and bear it, or loose my Radiacode. At first I tried to prise the old battery out in the house. The battery was stuck tight and needed levering up bit by bit to undo the sticky adhesive pad. As I was prising it out the battery was bending a bit. Not good. I didn't like that at all, so I chose to do this outside instead, wearing a pair of welding gloves in case it went up in flames in my hands. Eventually after much persuasion prying it up with the blunt end of a pair of tweezers it popped out, kind of wrinkled and a little bent, but it was out.
Once the old battery out, if it didn't burst into flames or explode, remove the wire from the battery as close to the battery as you can. This is going to be reused on the new battery. I chose to just cut the protection PCB from the old battery and desolder the wires from the small protection PCB. The Kapton take will have to be removed to gain access to the battery terminals in order to cut them. Or the wires could just be desoldered with the protection PCB in place. Be careful not to cause a short circuit.
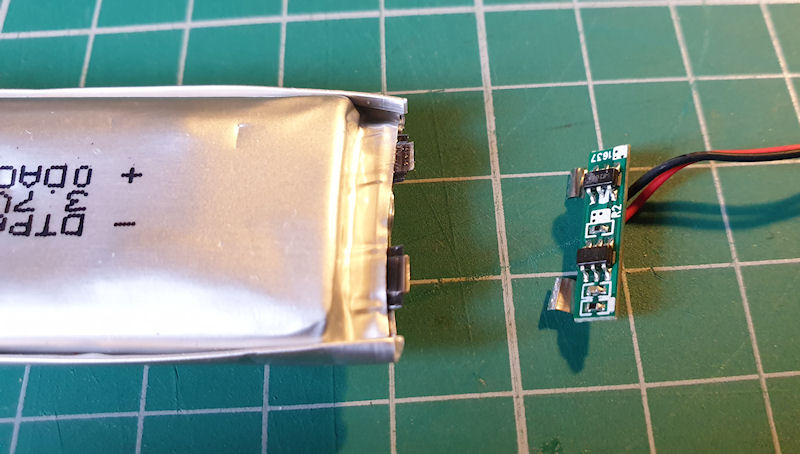
Grab the new battery and carefully remove the Kapton tape as it is going to be reused. Unfold the protection PCB to gain access to the underside where the wires are soldered on.
Very very carefully desolder the wires taking much care not to cause a short circuit.
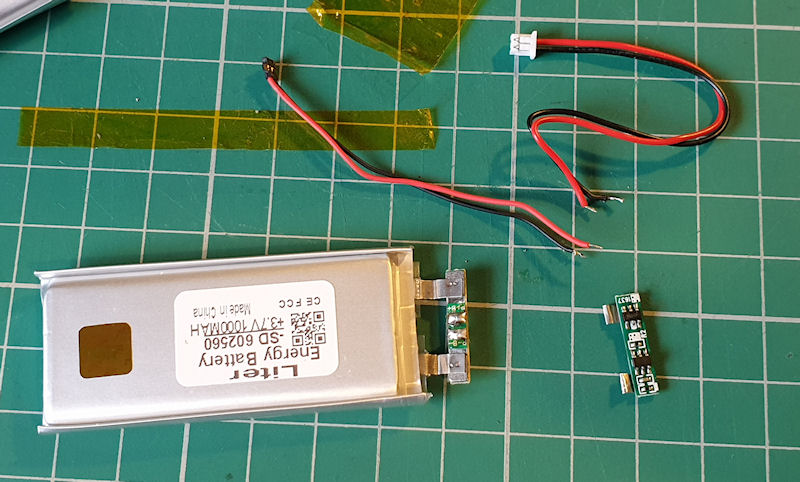
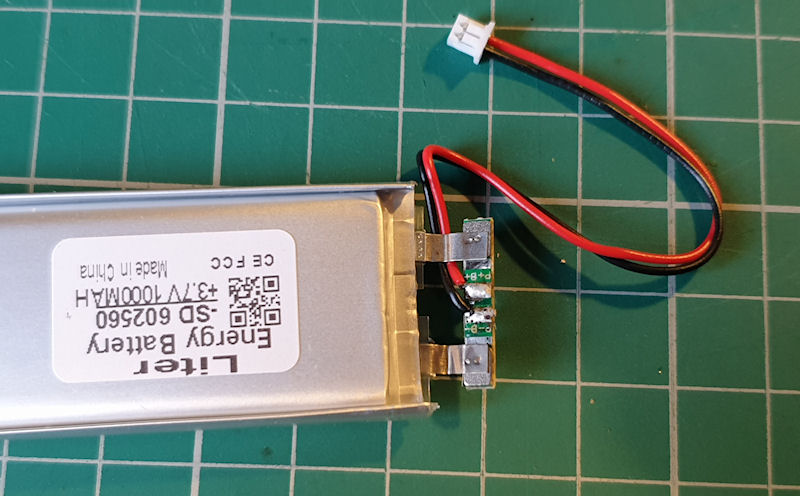
Then solder the original wires on to the protection PCB (attached to the new battery), again, being careful not to cause a short.
And finish up by sticking the Kapton tape back on and fold in the protection PCB.
Next apply some of your favourite double sided sticky stuff to the underside of the new battery. I used a quality 3M automotive adhesive foam tape. Don't use hot glue. LiPo's don't like much heat.
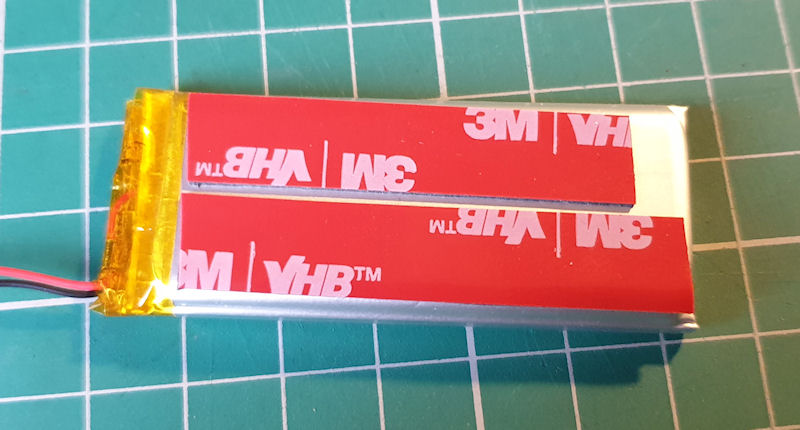
Without peeling the backing from the adhesive tape, place the battery back into the case and check the fitment. Make sure it is firmly down in the bottom of the case. If the battery is fitted poorly the components of the Radiacode 101 may puncture the new battery and give you a really bad day. Once a good fitment is observed, remove the new battery, peel the backing from the tape and stick it down in the case. A good even, firm press down is all that is needed. Don't do anything to distort the new battery.

Next, grab the other half (PCB half) of the Radiacode and connect the battery. Note the battery connector pushes down from the top. It does not slide in at the side. Looking at the connector it would seem it does slide in, but it doesn't.
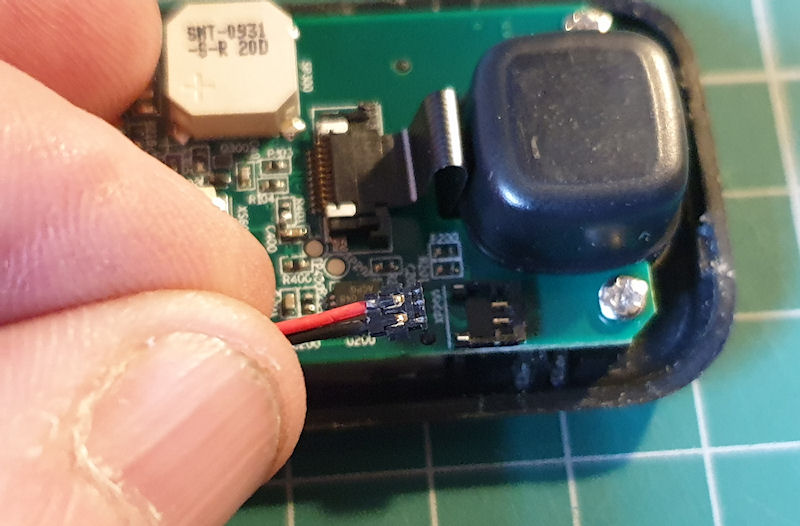
Line the connector up on the top of the socket and it should very easily pop into place. If you have any resistance then check the alignment and that you have it the correct way around. The positive goes towards the middle of the PCB, and the negative the outside of the PCB.
Once the battery is connected have a good look at your work and smile at the fantastic job you have just done, and that you are going to get another few years from your Radiacode.

Once you have finished inspecting your handy work, simply pop the two halves of the case back together and job done! Nice!
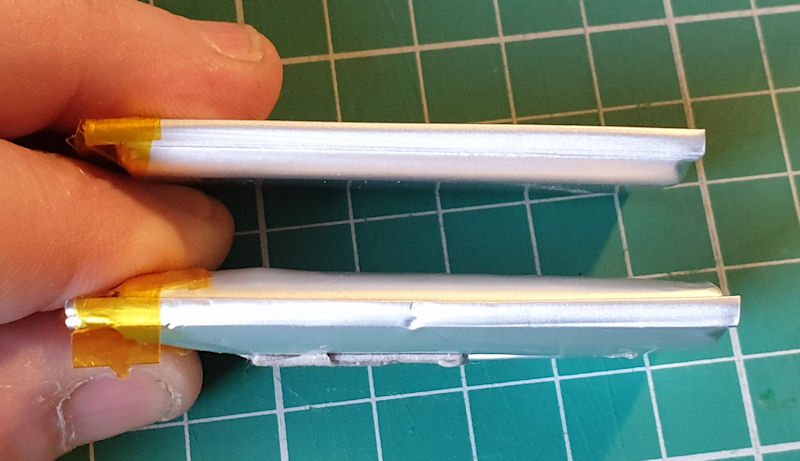
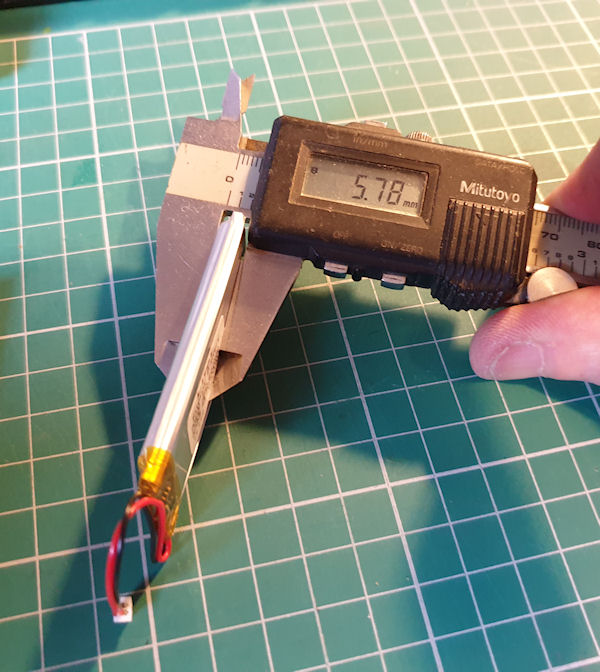
Here are some pictures of the old and new batteries. Note the vernier measurements. The old battery should be 6.3mm and the vernier is showing 7.06mm. It has certainly grown over time.

Replacing the LiPo battery on a Radiacode 101 was created by Simomax
I had to replace the battery in my Radiacode 101 as it was becoming potentially dangerous. I noticed the main button on the Radiacode wasn't pressing in properly and was sticking at times, so I popped the unit open and found the battery had expanded and was putting pressure on the circuit board, and thus making the button tight. The battery hadn't expanded like other LiPo's I have had, where they become springy and spongy (gas being released into the battery packet), this had expanded and was rock hard. Iv'e never seen that before. I didn't like it, so immediately removed the battery from the device (and that was a proper load of scary fun) and put it outside. I take no chances with LiPo's when they start to expand. It is a sign that the chemicals in the battery are getting unstable and starting to off-gas. I got the Radiacode sometime in 2021 so I reckon the battery has lasted for about 3 years. It was probably at about 50-60% capacity as I was having to recharge it about every week. When I first got the unit I charged it about every two weeks. It's not done bad, but I think could have done better. I think my phone fast charger may have shortened it's life a bit and it was starting to get hotter than usual when recharging using the phone charger. I think I'll use a 500ma basic dumb charger from now on.
At first I couldn't find a direct drop-in replacement battery. Apparently Radiacode will sell me one but they didn't have one for sale on their store, and I couldn't be bothered waiting about for emails and stuff so I looked for an alternative, with little avail. After a little research I found that the battery number is it's dimensions, much like an 18650 cell (18mm round by 65.0mm long.) The original battery is a single cell, 1000mAh, 602563 type, and the number means 60mm length, 25mm width and 6.3mm thick. I couldn't find any battery with the number 602563, but I did find plenty that are 602560. So the same length and width and 0.3mm thinner. The battery I bought came from Ali Express here: https://www.aliexpress.com/item/1005003070400971.html
Here is a step-by-step guide on replacing the battery in a Radiacode 101. I suspect the same applies with the 102 and 103, but I can't confirm that. They appear to all be the same construction. I took the old battery out before I even ordered the new one so sadly I don't have many pictures from when I took it out. I think every Radiacode owner is going to have to do this at least once if they want their unit to last. It's one of the many pitfalls of using this kind of battery technology - it just doesn't last long. A Geiger counter should be forever, not just three years!
First power off and open up the Radiacode 101. The case is clipped together very much like a TV remote control so use a good spudger, and it seems easiest to start prying in the middle of the case at the sides and working towards each end. This is my favourite type of spudger for these kinds of cases (not this particular make, but this spring steel type.) Eventually it will pop open when all the clips are released. Be careful as the battery is stuck to one part of the case and the PCB the other part of the case. Once open disconnect the battery connector from the PCB by tugging gently on the cable. Then put the PCB part over to one side where it can't be knocked or damaged.
Next is removal of the old battery. Grab something hard and blunt, slide it under the bottom of the battery and start to pry it out. In all honesty this was scary and I wasn't comfortable doing this at all. But it was either grin and bear it, or loose my Radiacode. At first I tried to prise the old battery out in the house. The battery was stuck tight and needed levering up bit by bit to undo the sticky adhesive pad. As I was prising it out the battery was bending a bit. Not good. I didn't like that at all, so I chose to do this outside instead, wearing a pair of welding gloves in case it went up in flames in my hands. Eventually after much persuasion prying it up with the blunt end of a pair of tweezers it popped out, kind of wrinkled and a little bent, but it was out.
Once the old battery out, if it didn't burst into flames or explode, remove the wire from the battery as close to the battery as you can. This is going to be reused on the new battery. I chose to just cut the protection PCB from the old battery and desolder the wires from the small protection PCB. The Kapton take will have to be removed to gain access to the battery terminals in order to cut them. Or the wires could just be desoldered with the protection PCB in place. Be careful not to cause a short circuit.
Grab the new battery and carefully remove the Kapton tape as it is going to be reused. Unfold the protection PCB to gain access to the underside where the wires are soldered on.
Very very carefully desolder the wires taking much care not to cause a short circuit.
Then solder the original wires on to the protection PCB (attached to the new battery), again, being careful not to cause a short.
And finish up by sticking the Kapton tape back on and fold in the protection PCB.
Next apply some of your favourite double sided sticky stuff to the underside of the new battery. I used a quality 3M automotive adhesive foam tape. Don't use hot glue. LiPo's don't like much heat.
Without peeling the backing from the adhesive tape, place the battery back into the case and check the fitment. Make sure it is firmly down in the bottom of the case. If the battery is fitted poorly the components of the Radiacode 101 may puncture the new battery and give you a really bad day. Once a good fitment is observed, remove the new battery, peel the backing from the tape and stick it down in the case. A good even, firm press down is all that is needed. Don't do anything to distort the new battery.
Next, grab the other half (PCB half) of the Radiacode and connect the battery. Note the battery connector pushes down from the top. It does not slide in at the side. Looking at the connector it would seem it does slide in, but it doesn't.
Line the connector up on the top of the socket and it should very easily pop into place. If you have any resistance then check the alignment and that you have it the correct way around. The positive goes towards the middle of the PCB, and the negative the outside of the PCB.
Once the battery is connected have a good look at your work and smile at the fantastic job you have just done, and that you are going to get another few years from your Radiacode.
Once you have finished inspecting your handy work, simply pop the two halves of the case back together and job done! Nice!
Here are some pictures of the old and new batteries. Note the vernier measurements. The old battery should be 6.3mm and the vernier is showing 7.06mm. It has certainly grown over time.
Attachments:
The following user(s) said Thank You: Alpha01
Please Log in or Create an account to join the conversation.

1 year 5 months ago #7166
by Alpha01
Replied by Alpha01 on topic Replacing the LiPo battery on a Radiacode 101
Good to now, have a 102 and a 103G...
Any possibility to avoid transferring the pcb?
Any possibility to avoid transferring the pcb?
Please Log in or Create an account to join the conversation.
1 year 5 months ago #7167
by Simomax
Replied by Simomax on topic Replacing the LiPo battery on a Radiacode 101
I didn't transfer the small battery protection PCB as the new battery already has one. I simply cut it off the old battery to aid in desoldering the wires.
If the replacement LiPo already has a protection PCB you need to just change the red/black wires and connector. If the new LiPo does not have a protection PCB, then this would have to be transferred to the new battery.
If the replacement LiPo already has a protection PCB you need to just change the red/black wires and connector. If the new LiPo does not have a protection PCB, then this would have to be transferred to the new battery.
Please Log in or Create an account to join the conversation.
1 year 5 months ago - 1 year 5 months ago #7168
by Bert490
Replied by Bert490 on topic Replacing the LiPo battery on a Radiacode 101
Although fully desoldering and re-using the original wires makes for a neater look, I normally cut the wires and do an inline solder splice in cases like this. It avoids touching the protection board. Tiny heat-shrink tubing is one of the most used items for me.
Last edit: 1 year 5 months ago by Bert490.
Please Log in or Create an account to join the conversation.
1 year 4 months ago #7169
by Simomax
Replied by Simomax on topic Replacing the LiPo battery on a Radiacode 101
I do that sometimes too, Bert490. In this case I wanted to keep it as original as possible. Your method would work equally as well.
Please Log in or Create an account to join the conversation.
Moderators: Gamma-Man
- Forum
- Geiger counter discussions
- Commericial geiger counters
- Replacing the LiPo battery on a Radiacode 101
Time to create page: 0.296 seconds